Adjusting the Black Level

When two images overlap, the overlapping area can be different in brightness and tone from the areas that do not overlap. You can use the projector's Black Level setting to reduce this difference and make it less noticeable (PowerLite Pro G6800/G6900WU).


Note:
  • You cannot adjust the black level when a test pattern displayed.
  • The brightness and tone of the overlapping areas may differ from the rest of the image even after adjusting the black level.
  1. Press the Menu button.
  2. Select the Extended menu and press Enter.
  3. Select the Multi-Projection setting and press Enter.
  4. Select the Edge Blending setting and press Enter. You see this screen:


  5. Select the Black Level setting and press Enter. You see this screen:


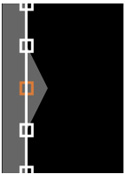
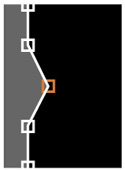
  6. Select the Area Correction setting and press Enter. The points you can use to set the range for black level adjustments are displayed.
    Note: The points displayed differ depending on the edge settings (Top Edge, Bottom Edge, Right Edge, Left Edge) and the geometric adjustment method selected. For example, if Left Edge is set and 5 × 5 is selected for the Point Correction setting, you see a screen like this:


  7. Use the arrow buttons to select an adjustment point and press the Enter button. The selected point turns orange.


  8. Use the arrow buttons to move the point.


  9. To move another point, press the Esc button and repeat the previous two steps.
  10. When you are finished, press the Esc button twice and select Yes when you see the confirmation message to return to the Black Level menu screen.
    Note: Changing any of the Top Edge, Bottom Edge, Right Edge, or Left Edge settings will reset the Black Level setting to its default value.
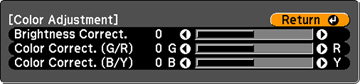
  11. Select the Color Adjustment setting and press Enter. You see this screen:


  12. Adjust the brightness and tone of the areas that do not overlap to match the areas that overlap using the displayed adjustment sliders.


  13. When you are finished, press the Menu button to exit.