Be sure you have your replacement cartridges handy before you begin. You must install new cartridges immediately after removing the old ones.
Caution:
Do not open ink cartridge packages until you are ready to install the ink. Cartridges are vacuum packed to maintain reliability.
Do not open ink cartridge packages until you are ready to install the ink. Cartridges are vacuum packed to maintain reliability.
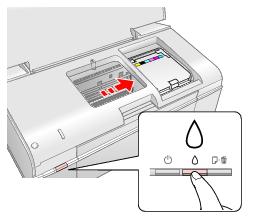
If a cartridge is expended, the  ink light on the control panel stays on. You must replace the cartridge to be able to print.
If the  ink light is flashing, a cartridge is low on ink; replacement is recommended.
|
3.
|
Press the
|
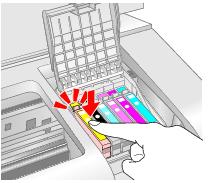
If you are replacing a low or expended cartridge, the print head moves to the  position to indicate which cartridge is low or expended.

If you are replacing a cartridge before it is low or expended, the print head moves directly to the ink cartridge replacement position. Skip to step 5.
|
4.
|
Press the
|
If another cartridge is low or expended, it moves to the  position. Press the
  ink button again to see if more cartridges are expended.
If no other cartridges are low or expended, the print head moves to the replacement position on the right.
|
6.
|
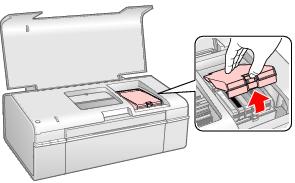
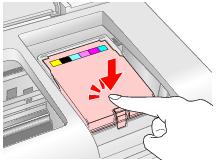
Squeeze the tab on the cartridge and lift the cartridge straight up to remove it. Dispose of it carefully. Do not take the used cartridge apart or try to refill it.
|

Warning:
If ink gets on your hands, wash them thoroughly with soap and water. If ink gets into your eyes, flush them immediately with water. Keep ink cartridges out of the reach of children.
If ink gets on your hands, wash them thoroughly with soap and water. If ink gets into your eyes, flush them immediately with water. Keep ink cartridges out of the reach of children.
|
7.
|

|
10.
|
|
11.
|
Press the
|
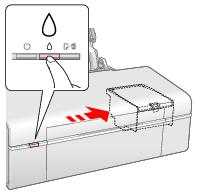
When the  power light stops flashing and remains on, ink charging is finished.
Caution:
Never turn off the printer while ink is charging or you’ll waste ink.
If the ink light flashes, press the
  ink button again and press down all the cartridges securely.
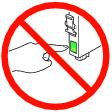
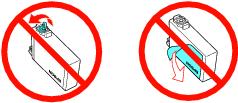
If you remove an ink cartridge for later use, protect the ink supply area from dirt and dust, and place it in a plastic bag. Store the cartridge in the same environment as the printer with the label facing upward. Note that there is a valve in the ink supply port, making covers or plugs unnecessary, but care is needed to prevent the ink from staining items that the cartridge touches. Do not touch the ink cartridge ink supply port or surrounding area, and do not store the cartridge upside down.
If you remove a low or expended ink cartridge, you cannot reinstall and use the cartridge.
Never turn off the printer while ink is charging or you’ll waste ink.
If the
If you remove an ink cartridge for later use, protect the ink supply area from dirt and dust, and place it in a plastic bag. Store the cartridge in the same environment as the printer with the label facing upward. Note that there is a valve in the ink supply port, making covers or plugs unnecessary, but care is needed to prevent the ink from staining items that the cartridge touches. Do not touch the ink cartridge ink supply port or surrounding area, and do not store the cartridge upside down.
If you remove a low or expended ink cartridge, you cannot reinstall and use the cartridge.