Once you have connected your camera, you can load paper and print your photos.
|
1.
|
Load the paper on which you want to print your photos.
|
|
2.
|
|
3.
|
Press OK.
|
|
4.
|
Press
|
|
5.
|
Press OK.
|
|
6.
|
|
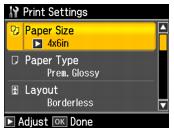
•
|
To change the paper size, press
|
|
•
|
To change the paper type, press
|
|
•
|
To change the layout, press
|
|
•
|
To change the copy quality, press
|
|
•
|
To adjust the amount of image expansion when printing borderless photos, press
|
|
•
|
To print the date on your photos and select the format for it, press
|
|
•
|
To print information on your photos, press
|
|
•
|
To automatically crop your photo to fit in your selected layout, press
|
|
•
|
To slow down printing to improve print quality, press
|
|
•
|
To adjust the print area on a CD, press
|
|
•
|
To adjust the CD density, press
|
|
9.
|
|
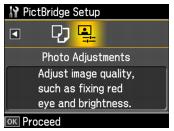
•
|
For the best quality printing, press
|
|
•
|
To change the automatic adjustment mode of the Fix Photo setting, press
|
Note:
Fix Photo uses a sophisticated face recognition technology to optimize photos that include faces. For this to work, both eyes and the nose must be visible in the subject’s face (without sunglasses). If your photo includes a face with an intentional color cast, such as a statue, you may want to turn off Fix Photo to retain the special color effects.
Fix Photo uses a sophisticated face recognition technology to optimize photos that include faces. For this to work, both eyes and the nose must be visible in the subject’s face (without sunglasses). If your photo includes a face with an intentional color cast, such as a statue, you may want to turn off Fix Photo to retain the special color effects.
|
•
|
To remove the effects of red eyes in portraits, press
|
|
•
|
To convert your photo to sepia-tone or black-and-white, press
|
|
•
|
To adjust the Brightness, Contrast, Sharpness, or Saturation in all your printed photos, press
|
When you finish printing, turn off your camera and disconnect it from the  USB connector on the Artisan 700 Series.