Before printing from your camera, you should select the print settings you will use for printing your photos.
|
1.
|
|
2.
|
|
3.
|
Select Print Settings and change any settings as needed.
|
|
•
|
To change the paper size, select Paper Size and choose the size of paper you loaded.
|
|
•
|
To change the paper type, select Paper Type and choose the type of paper you loaded.
|
|
•
|
To change the layout, select Layout and choose one of the settings shown on the screen. Press
|
|
•
|
|
•
|
To adjust the amount of image expansion when printing borderless photos, press
|
|
•
|
To print the date on your photos and select the format for it, press
|
|
•
|
To print information on your photos, press
|
|
•
|
To automatically crop your photo to fit in your selected layout, select Fit Frame, then choose On. Turn it off to print your entire photo and leave a small white margin, if necessary.
|
|
•
|
To slow down printing to improve print quality, select Bidirectional and choose Off (choose On for faster print speed).
|
|
5.
|
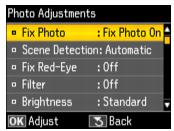
Select Photo Adjustments and change any settings as needed.
|
|
•
|
For the best quality printing, select Fix Photo and choose Fix Photo On. This automatically adjusts brightness, contrast, and saturation to best effect. You can also choose Fix Photo Off to turn off this adjustment, or P.I.M. to use your camera’s PRINT Image Matching or Exif Print adjustments.
|
To change the automatic adjustment mode of the Fix Photo setting, select Scene Detection and choose People, Landscape, or Night Scene.
|
•
|
|
•
|
|
•
|
To adjust the Brightness, Contrast, Sharpness, or Saturation in all your printed photos, select these options and select more or less of the effect.
|
|
7.
|
Press Home to exit.
|