|
•
|
Select a printing preset to quickly select settings for common paper types, sizes, and print qualities.
|
For quick access to the most common settings, click the Shortcuts tab. Point to one of the Printing Presets to view a list of the settings for it.

To delete a preset you created, click Add/Remove on the Shortcuts tab, select the preset, and click Delete.
To reorder the list, highlight one of the Printing Presets and click the up or down arrow to move it. Or click Reset to return the list to its original order.
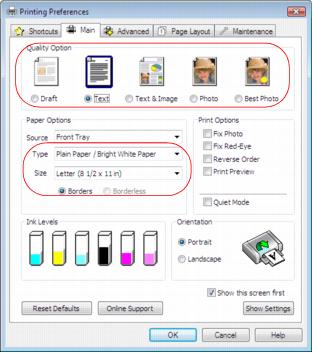
Click the Main tab on the top of the printer settings window to select your basic print options.
|
1.
|
Select a Quality Option that matches your document or photo, and the print quality you want.
|
|
2.
|
Select the paper Type setting that matches the paper you loaded.
|
|
3.
|
Select the paper Size setting for the paper you loaded. A User Defined option is also available so you can create a custom paper size.
|
|
4.
|
If you’re printing borderless photos, click the Borderless checkbox. For documents or photos with borders, select Borders.
|
|
5.
|
Choose Portrait or Landscape orientation for your document or photo. (Choose Landscape for printing envelopes.)
|
|
•
|
Select Quiet Mode to reduce the print speed for quieter operation at the same quality level.
|