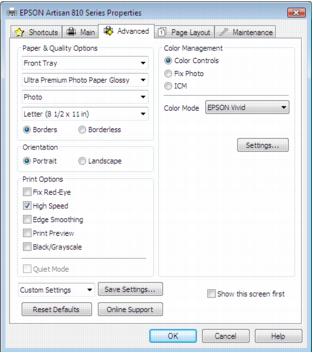
Click the Advanced tab on the top of the printer settings window to select Advanced options.
|
1.
|
Select the paper type setting that matches the paper you loaded.
|
|
3.
|
Select the paper size setting for the paper you loaded. A User Defined option is also available so you can create a custom size.
|
|
4.
|
If you’re printing borderless photos, select Borderless. For documents or photos with borders, select Borders.
|
|
5.
|
Choose Portrait or Landscape orientation for your document or photo. (Choose Landscape for printing envelopes.)
|
|
•
|
Select Black/Grayscale to print text and graphics in shades of gray (not recommended for printing black-and-white photos). Some color ink will still be used for print head maintenance.
|
|
•
|
Select Quiet Mode to reduce the print speed for quieter operation at the same quality level.
|
|
•
|
Select Color Management options
|
|
•
|
Color Controls: lets you select a Color Mode. Click Settings to adjust Brightness, Contrast, Saturation, Density, and individual Cyan, Magenta, and Yellow color tones.
|
Color Mode: when using Color Controls, selects the main method of printing colors for photos and graphics: EPSON Vivid or AdobeRGB.
Gamma: when using Adobe RGB, adjusts the midtone density in the print.
|
•
|
Fix Photo: improves the color, contrast, and sharpness of certain photos and provides special effect options.
|
|
•
|
ICM: lets you select Off (No Color Adjustment) to use only the color adjustments provided by your printing program.
|
|
•
|
Save all your selected settings for later use (click Save Setting and name the settings); to use saved settings later, select them from the Custom Settings list or from the Shortcuts tab
|
|
•
|
Return to the default settings (click Reset Defaults)
|
|
•
|
Access the Epson product support website (click Online Support).
|