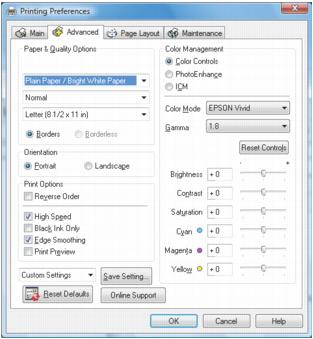
Click the Advanced tab on the top of the printer settings window to select Advanced options.
|
1.
|
Select the paper type setting that matches the paper you loaded.
|
|
•
|
Economy: for fast printing with reduced quality
|
|
•
|
Fast Economy: for the fastest printing with draft quality
|
|
•
|
Normal: for everyday text and image printing
|
|
•
|
Fine: for text and graphics with good quality and print speed
|
|
•
|
Super Fine: for text and graphics with high quality and print speed
|
|
•
|
Photo: for photos and graphics with good quality and print speed
|
|
•
|
Best Photo: for photos or graphics with high print quality
|
|
•
|
Photo RPM®: for the best print quality (and slowest print speed)
|
You can load paper in these sizes and select the size in the printer software. (Wider papers are for use only when reducing large images with the Reduce/Enlarge Document option.) User Defined and Custom options are also available so you can create a custom size.
|
4.
|
If you’re printing borderless photos, click the Borderless checkbox. For documents or photos with borders, select Borders.
|
|
5.
|
|
•
|
Select Print Options
|
|
•
|
Reverse Order: reverses the order in which your document prints to last-page-first.
|
|
•
|
High Speed: speeds up printing, but may reduce print quality
|
|
•
|
Black Ink Only: prints color documents or photos in black ink only
|
|
•
|
Edge Smoothing: prints sharper edges on low-resolution images, such as bars in a graph
|
|
•
|
Print Preview: lets you preview how your document or photo will look when printed.
|
|
•
|
Select Color Management options
|
|
•
|
Color Controls: lets you select a Color Mode and adjust Brightness, Contrast, Saturation, and individual Cyan, Magenta, and Yellow color tones.
|
|
•
|
Color Mode: when using Color Controls, selects the main method of printing colors for photos and graphics EPSON Vivid or AdobeRGB.
|
|
•
|
Gamma: when using Color Controls, adjusts the midtone density in the print.
|
|
•
|
PhotoEnhance: improves the color, contrast, and sharpness of certain photos and provides special effect options.
|
|
•
|
ICM: lets you select No Color Adjustment to use only the color adjustments provided by your printing program.
|
|
•
|
Save all your selected settings for later use (click Save Setting and name the settings); to use saved settings later, select them from the Custom Settings list
|
|
•
|
Return to the default settings (click Reset Defaults)
|