You can scan a one-page or a multi-page document and save it as a PDF (Portable Document Format) file on your computer.
|
1.
|
Place your originals on the scanner glass or in the Automatic Document Feeder.
|
|
3.
|
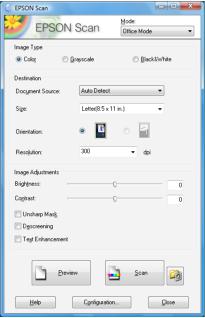
Select the Mode you want to scan with. Office Mode is recommended for scanning documents.
|
|
4.
|
For Office and Professional Mode, select whether you want to scan your originals with the ADF (Automatic Document Feeder) or document table (scanner glass). Select Auto Detect to locate the originals automatically, ADF (Automatic Document Feeder), or Document Table as the Document Source setting.
|
|
5.
|
|
6.
|
Click the Preview button to preview your image. If necessary, adjust the scan area.
|
If you’re using the Automatic Document Feeder, the ADF preview-scans the first page and ejects it. Place the page back on top of the other pages and reload them in the feeder.
|
7.
|
Click Scan.
|
|
8.
|
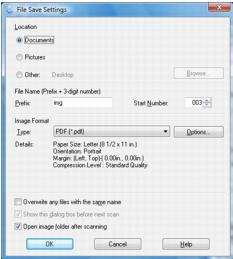
In the scan file settings window, select a folder for your file and select PDF as the file Type setting.
|
|
9.
|
If you need to change any of the current PDF settings, click the Options button. Select the settings that match your document and click OK.
|
|
10.
|
Click OK.
|
|
11.
|
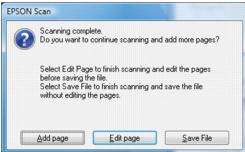
The CX9400Fax Series scans the first page and displays this window:
|
|
12.
|
If you’re scanning only one page, click Save File.
|
If you’re scanning multiple pages, click Add Page. Then replace the first page on the scanner glass with the second page and click Scan again, repeating as necessary for each page. When you’re finished, click Save File.
If you want to delete or reorder any of the pages, click Edit Page, then use the icons on the bottom of the editing window. (Click Help for details.) When you’re finished, click Save File.
|
13.
|
Click Close to exit Epson Scan.
|
Now you can view and print the scanned document in Adobe® Acrobat® or Reader®, attach it to an e-mail, and use it however you like.