|
1.
|
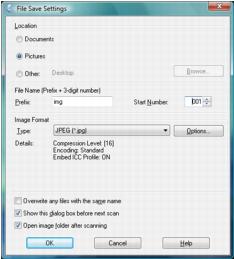
Select the folder in which you want to save your scanned image, either My Documents or My Pictures (some Windows versions), or Documents or Pictures (some Windows versions and Macintosh).
|
If you want to select another folder, click Other, then click Browse (Windows) or Choose (Macintosh) and select the folder. To save your image on the desktop, simply click Other.
|
2.
|
Specify a file name prefix. A 3-digit number is automatically added to the file name, but you can change the Start Number if you like. If you are scanning multiple images at once, each image will receive a different 3-digit number.
|
|
3.
|
Select a file format as described in the following table. Depending on the format, the Options button may be available for making detailed settings.
|
|
Format (File Extension)
|
|
|
The JPEG format lets you highly compress image data. However, the higher the compression, the lower the image quality. The TIFF format is recommended when modification and retouching are required.
|
|
|
A TIFF format where multiple pages are saved to the same file and you can edit the images using a program that supports it.
|
|
|
A file format created for exchanging data between many programs, such as graphic and DTP software.
|
|
|
A document format that can be read on both Windows and Macintosh systems using Adobe Reader or Acrobat. Multi-page documents can be saved as one PDF file.
|
|
|
PRINT Image Matching II (*.JPG) or (*.TIF)
|
File formats that include Epson PRINT Image Matching II data for enhanced quality and a wider color range (does not affect the way the image displays on the screen).
|
|
•
|
Overwrite any files with the same name
Select to overwrite previous files with the same names. |
|
•
|
Show this dialog box before next scan
Select to have the File Save Settings window appear automatically before you scan. |
|
•
|
Open image folder after scanning
Select to have Windows Explorer or Macintosh Finder automatically open to the folder where your scanned image is saved after scanning. |
|
5.
|
Click OK. Epson Scan starts scanning.
|