You can check the status of your Print Pack on the PictureMate photo viewer screen or with your computer software as described in these sections:
|
1.
|
|
2.
|
|
3.
|
Press
|
|
4.
|
Press OK to exit.
|
Note: If the screen displays a Print Pack low message, you should buy a new PictureMate 200 Series Print Pack. See Buying a PictureMate 200 Series Print Pack for details.
|
•
|
Double-click the
|
|
•
|
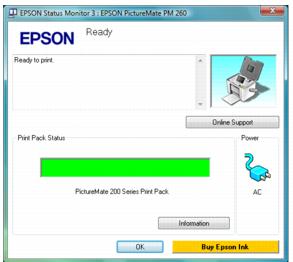
Open the printer software (see Printing From a Windows Computer for instructions), click the Maintenance tab, and click the EPSON Status Monitor 3 button.
|
|
•
|
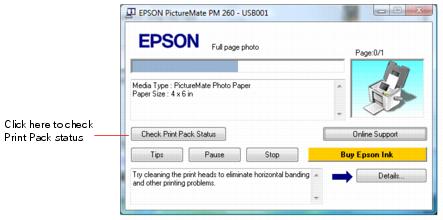
Send a print job to PictureMate. The progress meter appears automatically, with a button that lets you check the status:
|
Note: If your Print Pack is low, you should buy a new PictureMate 200 Series Print Pack. See Buying a PictureMate 200 Series Print Pack for details.
|
1.
|
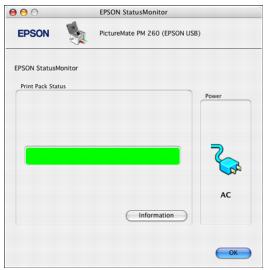
Double-click Macintosh HD (the default hard disk name), double-click the Applications folder, then double-click the EPSON Printer Utility2 icon. The Printer List window appears.
|
|
2.
|
|
3.
|
Note: If your Print Pack is low, you should buy a new PictureMate 200 Series Print Pack. See Buying a PictureMate 200 Series Print Pack for details.
|
4.
|
Click OK and close the EPSON Printer Utility2.
|
Tip: If you see a replacement message while printing, you can replace the Print Pack and continue the current print job. Just replace it without turning off and unplugging PictureMate.
You can check the Print Pack status any time PictureMate is not printing (see Checking Print Pack Status).
You can check the Print Pack status any time PictureMate is not printing (see Checking Print Pack Status).
Caution: Do not attempt to refill the photo cartridge. This could result in ink spills or other damage to PictureMate not covered by Epson’s warranty.
To ensure good results, use a genuine PictureMate 200 Series photo cartridge.
To ensure good results, use a genuine PictureMate 200 Series photo cartridge.
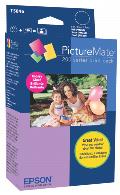
The PictureMate 200 Series Print Pack has everything you need to print in one box: photo paper and a photo cartridge.
|
Supported PictureMate models
|
||
|
Glossy photo paper (150 sheets) and photo cartridge
|
All PictureMate 200 Series models
|
|
|
Matte photo paper (100 sheets) and photo cartridge
|
Note: If you need more paper for any reason, use Epson Premium Photo Paper Glossy or Semigloss, borderless 4 ¥ 6 inch size. For more information, see How Many Photos Will I Get From a PictureMate 200 Series Print Pack?.
You can buy a PictureMate 200 Series Print Pack wherever PictureMate is sold or from retailers that sell printer supplies.
You can also buy a Print Pack and other PictureMate accessories from an Epson authorized reseller. To find the nearest reseller, call 800-GO-EPSON (800-463-7766). Or you can purchase online at www.epsonstore.com (U.S. sales) or www.epson.ca (Canadian sales).
Note: Use your photo cartridge within six months of installing it and before the expiration date on the package.
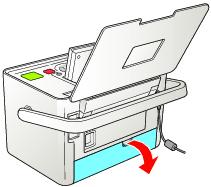
Make sure you have a new PictureMate 200 Series Print Pack before you remove the old photo cartridge. Once you remove the cartridge, you must install the new one right away.
|
3.
|
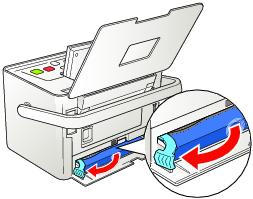
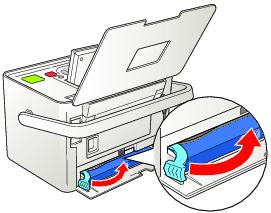
Slide the cartridge lever left, to the Release position.
|
|
4.
|
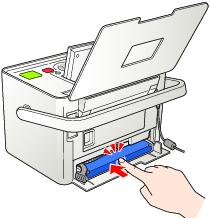
Pull out the cartridge and dispose of it properly. (For appropriate disposal, check local resources for recycling guidelines.)
|
Warning: Keep photo cartridges out of the reach of children and do not drink the ink.
If ink gets on your hands, wash them thoroughly with soap and water. If ink gets in your eyes, flush them thoroughly with water. If discomfort or vision problems continue after flushing, see a doctor immediately.
If ink gets on your hands, wash them thoroughly with soap and water. If ink gets in your eyes, flush them thoroughly with water. If discomfort or vision problems continue after flushing, see a doctor immediately.
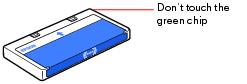
Caution: Don’t touch the small green chip. Install the photo cartridge immediately after you remove it from its package. If you leave a cartridge unpacked for a long time before using it, normal printing may not be possible.
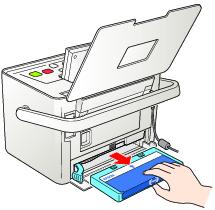
Note: The cartridge won’t go in all the way. You need to use the cartridge lever to lock it in place.
|
7.
|
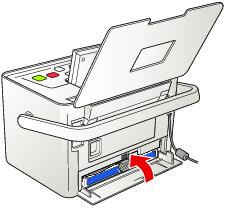
Slide the lever all the way right, to the Lock position.
|
Caution: If the cartridge is not inserted correctly, PictureMate will not be able to print. Once the cartridge is installed, do not release or adjust the lever. If you move the lever accidentally, remove the cartridge and reinstall it.
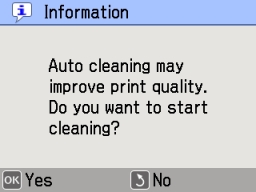
If your print quality is not as good as it used to be—if photos are too light, are missing colors, or have lines running through them—PictureMate’s print head may need cleaning.
If your prints look fuzzy or have light or dark lines running through them, you may need to align the print head.
Follow the steps in these sections to clean or align the print head using the PictureMate buttons or the PictureMate software on your computer:
Note: If you see a Print Pack low message on the photo viewer, you may not be able to clean the print head until you replace the Print Pack.
|
1.
|
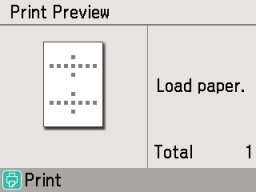
Load paper in PictureMate so you can print a nozzle check pattern after cleaning the print head. See Loading Paper for details.
|
|
2.
|
|
3.
|
|
4.
|
|
5.
|
Press OK again to clean the print head. Cleaning takes about 60 seconds. PictureMate makes some noise and you see an Auto Cleaning message.
|
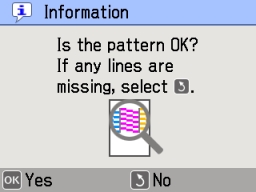
When cleaning is complete, PictureMate prints a nozzle check pattern and displays this screen:
|
•
|
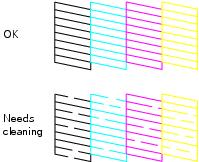
If the pattern looks OK, press OK to finish.
|
|
•
|
If the pattern has gaps or missing lines, press
|
Note: You can run a nozzle check before you clean the print head. Press  Menu, select Maintenance, then select Nozzle Check.
If you have moved PictureMate and the print quality is not as good as it used to be—if your prints look fuzzy or have light or dark lines running through them—you may need to align the print head.
|
1.
|
|
2.
|
|
3.
|
|
4.
|
|
5.
|
Press
|
|
6.
|
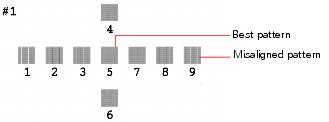
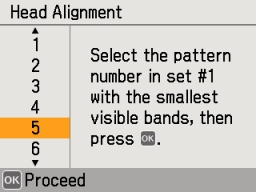
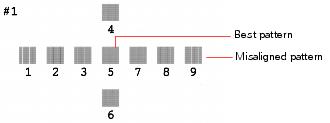
Look at the printed squares to determine which one is the most even, with no streaks or white lines. (You may need to use a magnifying glass.)
|
|
7.
|
|
8.
|
Note: The square you select becomes the middle square (#5) the next time you align the print head.
You can check PictureMate’s print quality from your computer and clean the print head, if necessary.
|
2.
|
Load paper in PictureMate so you can print a nozzle check pattern after cleaning the print head. See Loading Paper for details.
|
|
3.
|
Windows: Right-click the
|
Macintosh: Open the Applications folder and select EPSON Printer Utility2. Select your PictureMate model in the printer list, click OK, and select Nozzle Check.

If there are gaps, you need to clean the print head. See Cleaning the Print Head Using the Computer for instructions.
If your print quality is not as good as it used to be—if photos are too light, are missing colors, or have lines running through them—PictureMate’s print head may need cleaning. Follow the steps below to clean the print head.
Note: If you see a Print Pack low message on the screen, you can’t clean the print head until you replace the Print Pack.
|
2.
|
Load paper in PictureMate so you can print a nozzle check pattern after cleaning the print head. See Loading Paper for details.
|
|
3.
|
Windows: Right-click the
|
Macintosh: Open the Applications folder and select EPSON Printer Utility2. Select your PictureMate model in the printer list, click OK, and select Head Cleaning.
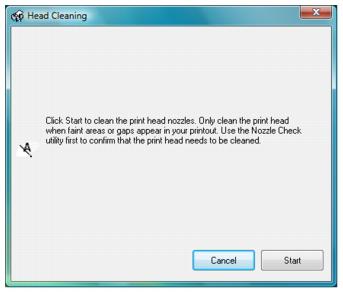
Cleaning takes about 60 seconds. PictureMate makes some noise and you see a Cleaning message on the screen.

|
•
|
If the pattern is OK, click Finish.
|
|
•
|
If the pattern has gaps or missing lines, click Clean to clean the print head again. You may need to clean it two or three times before the nozzles are clean.
|
If you have moved PictureMate and the print quality is not as good as it used to be—if your prints look fuzzy or have light or dark lines running through them—you may need to align the print head.
|
2.
|
|
3.
|
Windows: Right-click the
|
Macintosh: Open the Applications folder and select EPSON Printer Utility2. Select your PictureMate model in the printer list, click OK, and select Print Head Alignment.
|
5.
|
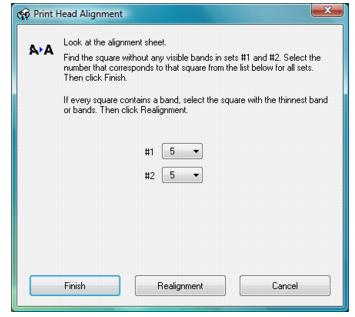
Look at the printed squares to determine which one in each pattern is the most even, with no streaks or white lines. (You may need to use a magnifying glass.)
|
|
6.
|
Enter the number of the best square in each pattern (1 to 9) in the boxes on the screen. Then click Finish.
|
If you can’t find a square without lines or streaks, choose the one that looks the best. Then click Realignment to print another alignment pattern and repeat this step.
Note: The square you select becomes the middle square (#5) the next time you align the print head.
|
2.
|
Remove all paper, then use a soft brush to clean any dust or dirt from the paper feeder and output tray.
|
|
4.
|
Use a soft, dry cloth to clean the PictureMate photo viewer screen. Do not use liquid or chemical cleaners on it.
|
Caution: Never use a hard or abrasive brush, or alcohol or thinner for cleaning; they can damage the components and case.
Don’t get water on the components and don’t spray lubricants or oils inside PictureMate.
Don’t get water on the components and don’t spray lubricants or oils inside PictureMate.
If PictureMate is going to travel a longer distance, pack it carefully to protect it from getting damaged.
Caution: Keep PictureMate out of the sun and don’t leave it in your car or other location where it can get too hot or too cold. Otherwise, PictureMate may be damaged or ink may leak.

|
3.
|
Press the
|
|
4.
|
Wait until the On light goes out, then unplug the power cord from the power outlet.
|

|
9.
|
Pack PictureMate in the box that it came in or in the optional carrying case. Place the power cable and adapter in the accessory box that came with PictureMate and pack it with the printer.
|
Caution: Make sure the photo cartridge is installed. Do not remove the photo cartridge before transporting. Don’t place PictureMate on its side or upside down, or ink may leak.
Note: If your prints don’t look as good after PictureMate has been moved, try aligning the print head. See Aligning the Print Head Directly From PictureMate.