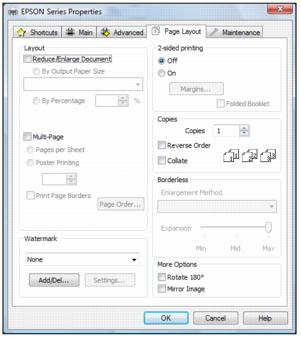
You can select a variety of sizing and layout options on the Page Layout tab.
|
1.
|
To size your printed document or photo, click the Reduce/Enlarge Document checkbox and select sizing options.
|
|
•
|
By Output Paper Size: sizes your printed document or photo to fit on the paper you loaded and selected in the box beneath the option.
|
|
•
|
By Percentage: sizes your printed document or photo by the percentage you select in the box next to the option.
|
|
2.
|
To print multiple pages on one sheet, or one image across multiple sheets, click the Multi-Page checkbox and select multi-page options.
|
|
•
|
Pages Per Sheet: prints 2 (2-up) or 4 (4-up) document pages on each sheet of paper.
|
|
•
|
Print Page Borders: prints borders around each page when you select Pages Per Sheet.
|
|
•
|
Page Order: selects the order in which the 2 or 4 pages print on the sheet.
|
|
•
|
Poster Printing: prints one page or image laid out on 2, 4, 9 or 16 sheets of paper to make a large poster, with or without borders (depending on the paper type).
|
|
•
|
Settings: accesses the poster portions, trim line, and alignment options you can use when you select Poster Printing.
|
|
3.
|
To add a watermark message to your printed document or photo, select a Watermark setting.
|
|
•
|
Watermark drop-down list: offers a selection of pre-defined watermark text, such as Confidential.
|
|
•
|
Add/Del button: lets you select or delete a previously added watermark.
|
|
•
|
Settings button: accesses settings to customize the way your watermark appears.
|
|
4.
|
To print on both sides of your paper, select a 2-sided Printing setting.
|
|
•
|
On: prints on both sides of the paper by prompting you to reload the printed pages as necessary. Select Off to print on just one side of each page.
|
|
•
|
Margins: customizes the margins used during double-sided printing.
|
|
•
|
Folded Booklet: organizes double-sided printing page order to create a folded booklet.
|
|
5.
|
To select multiple copies and their print order, use the Copies, Reverse Order, and Collate options.
|
|
6.
|
To adjust the amount of image expansion when printing borderless photos, select Auto Expand as the Enlargement Method, then adjust the Borderless Expansion slider to Min, Mid, or Max. (If you select Retain Size, the image is printed at its actual size without scaling.)
|
|
7.
|
To rotate or flip the image you’re printing, click the Rotate 180° or Mirror Image checkboxes. (If you are printing on Epson Iron-on Cool Peel Transfer Paper, turn on Mirror Image.)
|
