|
1.
|
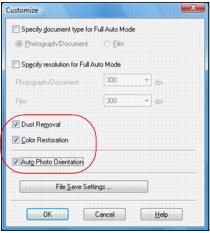
Click Customize.
|
|
2.
|
Click the Color Restoration checkbox.
|
|
3.
|
If you need to remove dust marks from your original document or photo as you scan, click the Dust Removal checkbox.
|
|
4.
|
Click the Auto Photo Orientation checkbox to have the Epson Stylus NX110 Series check the preview image for faces, the sky, and other features, and then correctly rotate the photo when it’s scanned. If your particular photo is not oriented correctly using this feature, turn off Auto Photo Orientation and try again.
|
|
5.
|
Epson Scan automatically saves your scanned file in JPEG format in Pictures or My Pictures (Windows), or in Pictures (Macintosh). If you want to select different scan file settings, click the File Save Settings button.
|
|
6.
|
Click OK to close the Customize window.
|
|
7.
|
Click Scan.
|
Note:
If you started your scan from within a TWAIN-compatible scanning program, your scanned images open in the program window. Click Close to exit Epson Scan.
If you started your scan from within a TWAIN-compatible scanning program, your scanned images open in the program window. Click Close to exit Epson Scan.
Now you can view and print the image.
