If your printouts become grainy or blurry, or you see dark or light bands across them, you may need to align the print head.
|
1.
|
Load a few sheets of letter-size plain paper in the sheet feeder.
|
|
2.
|
|
3.
|
|
4.
|
|
5.
|
Look at the alignment sheet that prints. Press
|
|
6.
|
Press the Menu button when you’re done to exit.
|
|
1.
|
Load a few sheets of plain paper in the sheet feeder.
|
|
2.
|
Windows:
Right-click the |
Macintosh:
Open the Applications folder, open EPSON Printer Utility3, select NX300 Series, and click OK. Then select Print Head Alignment.
Open the Applications folder, open EPSON Printer Utility3, select NX300 Series, and click OK. Then select Print Head Alignment.
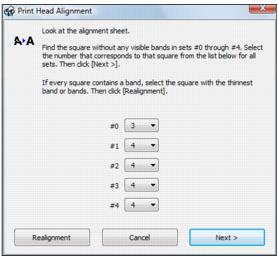
Note:
If no patterns are aligned, choose the closest one and click Realignment. Then print another alignment sheet and check it.
If no patterns are aligned, choose the closest one and click Realignment. Then print another alignment sheet and check it.
|
6.
|
When you’re done, click Finish.
|