You can copy photos onto 4 × 6 inch, 5 × 7 inch, letter-size, or A4-size Epson special paper (various types available) just like you would on a copy machine.
|
1.
|
Press the
|
|
2.
|
Load 4 × 6 inch, 5 × 7 inch, letter-, or A4-size Epson photo paper in the sheet feeder.
|
|
3.
|
Place your original document on the document table.
|
|
4.
|
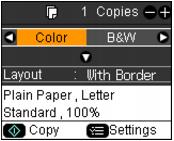
Press the Copy button.
|
|
5.
|
|
6.
|
|
7.
|
Press
|
Select With Border to leave a small margin around the image or select Borderless to expand the image all the way to the edge of the paper (slight cropping may occur).
|
8.
|
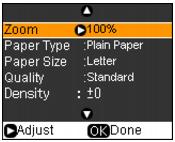
To change any of the print settings displayed on the screen, press Menu and select your settings.
|
|
•
|
To adjust the copy size, select Zoom and choose either Actual (to select a percentage using + or –) or Auto Fit Page (to automatically size the image to fit your paper).
|
|
•
|
To change the paper type, select Paper Type and choose the type of paper you loaded.
|
|
•
|
To change the paper size, select Paper Size and choose the size of paper you loaded. (Paper Size options depend on the Paper Type setting you choose.)
|
|
•
|
To change the copy quality, select Quality and choose Standard, Best, or Draft. (Standard is the default setting for Quality if you choose photo paper.)
|
|
•
|
To adjust the darkness or lightness of the copy, select Density and choose a higher (darker) or lower (lighter) setting.
|
|
•
|
To adjust the amount of image expansion when printing borderless photos, select Expansion and choose Standard, Min, or Mid. (You may see white borders on your printed photo if you use the Min setting.)
|
|
10.
|
Press
|
To cancel copying, press  Stop/Clear Settings.