You can also restore the colors in faded photos, print with or without borders, convert color photos to black-and-white, and crop photos.
|
1.
|
Press the
|
|
2.
|
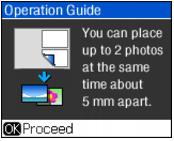
Load 4 × 6-inch, 5 × 7-inch, 8 × 10-inch, or letter-size Epson photo paper (various types available) in the sheet feeder.
|
|
3.
|
Place your original photo on the document table.
|
|
4.
|
Press the Restore button.
|
|
5.
|
Press OK.
|
|
6.
|
To turn on Color Restoration to restore colors in faded photos as you copy, press
|
|
7.
|
Press OK.
|
|
8.
|
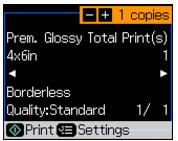
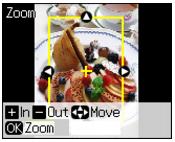
Press OK to prescan your photo. You see these settings over a preview of your photo:
|
|
9.
|
|
10.
|
|
•
|
|
12.
|
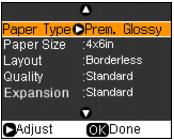
To change any of the print settings displayed on the screen, press Menu and select your settings.
|
|
•
|
To change the paper type, select Paper Type and choose the type of paper you loaded.
|
|
•
|
To change the paper size, select Paper Size and choose the size of paper you loaded.
|
|
•
|
To change the layout, select Layout and choose With Border to leave a small margin around the image or select Borderless to expand the image all the way to the edge of the paper (slight cropping may occur).
|
|
•
|
|
•
|
To adjust the amount of image expansion when printing borderless photos, select Expansion and choose Standard, Min, or Mid.
|
|
14.
|
Press
|
To cancel copying, press  Stop/Clear Settings.