|

Reference Guide
|
|
Using the Multi Photo Feeder
Replacing the Paper Path Guide
After you have used the Multi Photo Feeder for a long time,
a line of dots may begin to appear on your scanned images. The plastic tab on
the paper path guide on the bottom of the Multi Photo Feeder cover may be bent.
If this happens, follow the steps below to replace the paper path guide with
the spare one that comes with your Multi Photo Feeder.
 |
Unplug the scanner to turn it off. |
 |
Disconnect the Multi Photo Feeder cable from the scanner's Option port.
|
 |
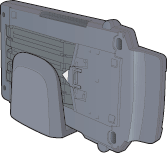
Place the Multi Photo Feeder in its stand as shown below. |
 |
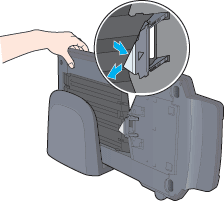
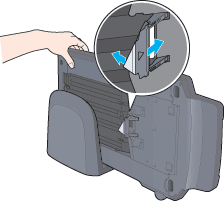
Flip out the paper path guide and pull it gently off the Multi Photo
Feeder as shown below. |
 |
Place the new paper path guide so the triangle mark faces out. Slide
it onto the tabs on the Multi Photo Feeder until they click. Then press
the paper path guide down into its slot until it clicks into place. |
 |
Note:
|
 |
- Be sure the paper path guide is installed
correctly as shown above; otherwise, it may cause a jam.
|
|
|
- Do not touch the plastic tab on the paper
path guide to prevent it from being bent.
|
|
|
- Do not attach the paper path guide using
too much force. If the paper path guide is in the correct position,
you can easily attach it without using much force.
|
|
|
- Be careful not to let the paper path guide
touch the stand.
|
|

[Top]
| Version 1.00E, Copyright © 2001, SEIKO EPSON CORPORATION |

