|

Reference Guide
|
|
How To / Using Automatic Roll Paper Cutter
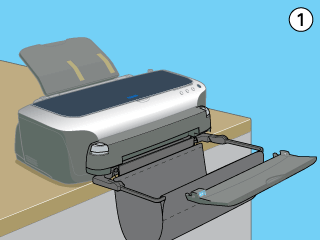
Using the Basket
You can carry out normal printing with the cutter and the basket attached. However, you also need to attach the output tray to the printer. To attach the output tray, follow the instructions below.
 |
Join the hole that is on the right of the output tray and the prong that is on the right of the cutter's paper feeder.
|
 |
Press the lever that is on the left side of the output tray to the right.
|
 |
Leaning the output tray, then insert the prong that is on the left of the output tray into the slot on the left of the cutter's paper feeder.
|
 |  |
Note:
|
By closing the basket, you can store both the basket and the output tray as shown below.


[Top]
| Version 1.00E, Copyright © 2001, SEIKO EPSON CORPORATION |

