Q: How do I install a printer driver from the EPSON Stylus Photo 825 CD-ROM on a Macintosh with OS X?
A: First you'll install your printer software for OS X applications. You'll install both a printer driver and a memory card driver, and restart your Macintosh after each one. Then you'll restart your Macintosh in OS 9.x and install your printer software for OS 8.6 to 9.x applications.
1. Start up your Macintosh in OS X. (Make sure your printer is still on.)
2. Put the EPSON CD-ROM in your CD-ROM or DVD drive and wait a few seconds for the CD-ROM to be recognized.
3. Select EPSON on your desktop. Then select the SP825 icon in the window that opens.

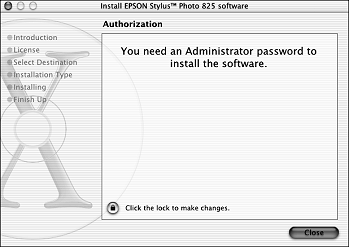
4. If you have an administrator password, you see the Authorization screen.

5. Click the lock icon, then enter your password and click OK.
6. Click Continue, then read and agree to the license agreement to continue the installation.
7. Select the OS X drive or partition and click Continue.
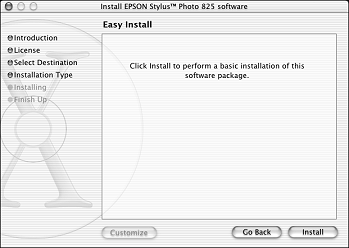
8. When you see the Easy Install screen, click Install.

9. Follow the on-screen instructions to complete the installation and restart your Macintosh.
Then follow the steps in the next section to install the storage driver and additional software.
1. After your Macintosh restarts, select the EPSONStorage icon.
2. If you have an administrator password, click the lock icon, enter the password, and click OK.
3. Click Continue on the next screen. Then follow the on-screen instructions to select the OS X drive or partition, complete the installation, and restart your Macintosh.
4. After your Macintosh restarts, install Film Factory and follow the on-screen instructions. When you finish, click Quit to return to the Installer.
5. Install ArcSoft PhotoImpression and follow the on-screen instructions. Then click Quit to return to the Installer.
6. Install the Printer Manual and follow the on-screen instructions.
7. If you have Photoshop 7, you can install the P.I.M. plug-in. Drag the PRINT Image Matching icon to the Photoshop Plug-in folder on your Macintosh.
8. Open the OS X Applications folder, then open the Utilities folder and select Print Center.
Note: If you see a message saying 'You have no printers available', click Add.
If SP825 already appears in the Printer list, go to step 11.

9. At the Printer List screen, click Add Printer.
10. Select EPSON USB, click SP 825(USB), then click Add.

Note: The printer must be connected to the computer and turned on. Your printer appears on the printer list.
11. Close Print Center and start up your Macintosh in OS 9.x. Follow the instructions in the next section to install the OS 9.x printer driver and optional software for your Macintosh Classic applications. (You don't need to reinstall your printer manual.)
Now you must install the Printer Driver and Utilities for Mac OS 9.x
1. Leave in the CD-ROM as your Macintosh restarts in OS 9.x.
2. If you see a message saying 'Software needed for the USB device SP 825 Storage is not available', click Cancel.

3. Select EPSON on your desktop, if necessary. Then select EPSON in the window that opens.
4. Read and agree to the license agreement to continue the installation.
5. Click Install Printer Driver and Utilities and follow the on-screen instructions to install the software and restart your Macintosh.
Now continue with installing additional software for Mac OS 9.x.
1. After your Macintosh restarts, register your printer with EPSON as instructed.
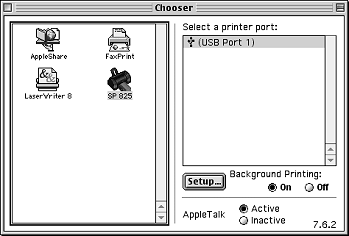
2. Open the Chooser from the Apple menu. Select SP 825 and select your USB port and turn on background printing.

3. Close the Chooser.
4. Select EPSON in the window on your desktop to open the Install Menu again.
5. Click Install Optional Software. You see the Optional Software screen.

6. Click the button for each program to learn more about it. If you want the program, click Install and follow the instructions on the screen.
If you see a message about installing QuickTime, click Yes and follow the on-screen instructions. You don't need a registration number.
7. When you're finished installing software, close any open windows and click Back to return to the Install Menu. Then click Exit. Remove the CD-ROM and keep it in case you need to reinstall any software later. You're ready to print!


