Click the Main tab on the top of the printer settings window to select your basic print options.

|
1.
|
Select the Media Type setting that matches the paper you loaded.
|
|
2.
|
|
3.
|
For the Print Quality setting, select Speed or Quality, or select Quality Options and choose the quality from the slider.
|
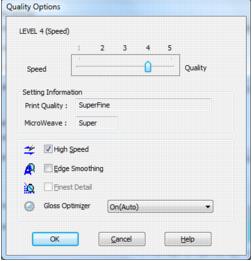
Use the Speed/Quality slider to set the desired quality level. Available print quality settings depend on the selected Media Type setting.
|
•
|
LEVEL 1: for fast printing with draft quality
|
|
•
|
LEVEL 2: for everyday text and image printing
|
|
•
|
LEVEL 3: for photos and graphics with good print quality and speed
|
|
•
|
LEVEL 4: for photos and graphics with high print quality and slower speed
|
|
•
|
LEVEL 5: for the best print quality and slowest print speed (recommended for canvas media)
|
|
•
|
High Speed: for fast, bidirectional printing at lower quality
|
|
•
|
Edge Smoothing: to improve the quality of low-resolution images
|
|
•
|
Finest Detail: for sharper edges on vector-based data including text, graphics, and line art (This setting does not affect photographs.)
|
|
•
|
Gloss Optimizer: to add a glossy finish to your print
|
|
4.
|
Select the desired color management option as the Mode setting.
|
|
•
|
EPSON Standard (sRGB) increases the contrast in images. Click the Advanced button to use advanced color controls.
|
|
•
|
Adobe RGB matches image colors to the Adobe RGB color standard. Use this setting if your source file was captured in Adobe RGB. Click the Advanced button to use advanced color controls.
|
|
•
|
Epson Vivid processes colors to create standard hues. Click the Advanced button to use advanced color controls.
|
|
•
|
PhotoEnhance lets you choose from various Scene Correction settings to automatically analyze your photos and, if necessary, adjusts the brightness, contrast, and saturation.
|
Note:
PhotoEnhance™ uses a sophisticated face recognition technology to optimize photos that include faces. For this to work, both eyes and the nose must be visible in the subject’s face. If your photo includes a face with an intentional color cast, such as a bronze statue, you may want to turn off PhotoEnhance to retain the special color effects.
PhotoEnhance™ uses a sophisticated face recognition technology to optimize photos that include faces. For this to work, both eyes and the nose must be visible in the subject’s face. If your photo includes a face with an intentional color cast, such as a bronze statue, you may want to turn off PhotoEnhance to retain the special color effects.
|
•
|
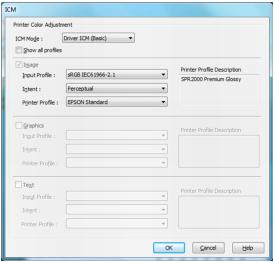
ICM: automatically adjusts colors based on the printer’s ICC profile and the selected Media Type setting, using the Image Color Matching system. Click the Advanced button to choose the input profile and other settings as shown below:
|
Note:
In most cases, you will get better results by applying color management in your application, rather than in the printer driver.
In most cases, you will get better results by applying color management in your application, rather than in the printer driver.
|
•
|
Off (No Color Adjustment): disables color management in the printer driver for a color-managed workflow with ICC profiles in ICC-compliant applications, such as Adobe® Photoshop®.
|
|
5.
|
Select the Source setting that matches the paper feeding method you are using.
|
|
•
|
Sheet: for sheets of paper loaded in the sheet feeder.
|
|
•
|
Roll Paper: for photos or panoramics up to 27 inches (68.6 cm) long. If desired, click Print page frame to print a cutting guideline around each photo.
|
|
•
|
Roll Paper (Banner): for photos or banners over 27 inches (68.6 cm) long. If desired, click Save Roll Paper to feed small amounts of roll paper between each banner.
|
|
•
|
Manual - Rear: for a sheet of compatible paper loaded in the rear manual feed tray.
|
|
•
|
Manual-Front Thick Paper: for thick media loaded in the front manual feed tray.
|
|
•
|
CD/DVD: for a disc loaded in the CD/DVD tray guide; see Print on a CD or DVD
|
|
6.
|
Select the paper Size setting for the paper sheets you loaded.
|
If you loaded roll paper, create a custom paper size. Select User Defined in the Size menu, then click the User Defined button. Type a name for your custom size. For the Paper Width, enter 8.3 for A4- or 12.95 for Super B-size rolls. For the Paper Height enter the desired length up to 44 inches. Click Save, click OK, then select your custom paper size in the Size menu.
Note:
For roll paper, make sure the maximum width of your photo is 8.3 or 13 inches to fit in the width of your roll paper (set the margins to 0 in your application software).
For roll paper, make sure the maximum width of your photo is 8.3 or 13 inches to fit in the width of your roll paper (set the margins to 0 in your application software).
|
7.
|
To print borderless photos, select Borderless, if available.
|
To adjust the amount of image expansion when printing borderless photos, click the Expansion button and adjust the Borderless Expansion slider to Min, Mid, or Max.
|
8.
|
To see a preview of how your document or photo will print, select Print Preview. (The preview appears after you press the Print button, but before printing starts.)
|
|
•
|
Return to the default settings (click Reset Defaults)
|