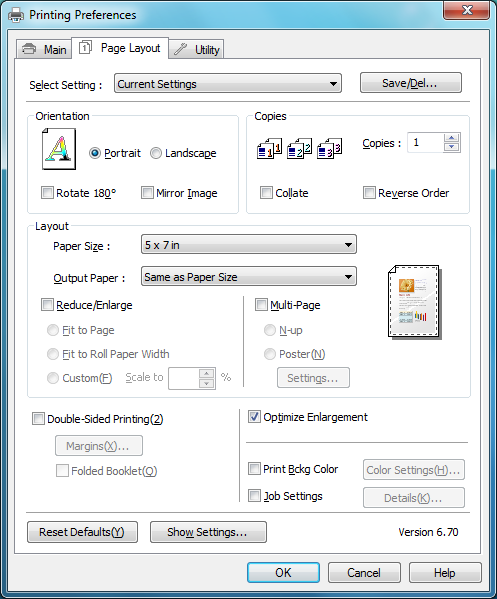
You can select a variety of sizing and layout options on the Page Layout tab.
|
1.
|
|
2.
|
|
3.
|
To select multiple copies and their print order, use the Copies, Collate, and Reverse Order options.
|
|
4.
|
To size your printed document or photo, click the Reduce/Enlarge checkbox and select sizing options.
|
|
•
|
Fit to page: sizes your printed document or photo to fit on the paper you loaded and selected in the Output Paper list above the option.
|
|
•
|
Fit to Roll Paper Width: sizes your printed document or photo to fit the width of the roll paper you loaded.
|
|
•
|
|
5.
|
To print multiple pages on one sheet, or one image across multiple sheets, click the Multi-Page checkbox and select multi-page options.
|
|
•
|
N-up: prints 2 (2-up) or 4 (4-up) document pages on each sheet of paper.
|
|
•
|
Poster: prints one page or image laid out on 4, 9 or 16 sheets of paper to make a large poster, with or without borders (depending on the paper type).
|
|
•
|
|
6.
|
To print on both sides of your paper, click Double-Sided Printing.
|
|
•
|
Double-Sided Printing: turns on printing on both sides of the paper by prompting you to reload the printed pages as necessary.
|
|
•
|
Margins: customizes the margins used during double-sided printing.
|
|
•
|
Folded Booklet: organizes double-sided printing page order to create a folded booklet.
|
|
7.
|
Note:
The driver will increase the image size up to 650% and decrease the output resolution to stay within the pixel limitations. Depending on the resolution of the original image and the print size, you may see reduced quality in the print.
The driver will increase the image size up to 650% and decrease the output resolution to stay within the pixel limitations. Depending on the resolution of the original image and the print size, you may see reduced quality in the print.
|
8.
|
To print color on the background of the page, select Print Bckg Color and click Color Settings to select the color you want to use.
|
|
9.
|
To have the time, date, and other information about your print job printed at the top or bottom of the page, select Job Settings and click Details to select the settings you want to use.
|