You can print your photos with no margins, extending the image all the way to the edges of the page. You get beautiful snapshots and enlargements, without trimming.
See Choosing Paper for Borderless Photos, then see these sections for instructions:
|
Paper Type or Media Type setting
|
||
|
Ultra Premium Photo Paper Glossy
|
||
|
Ultra Premium Photo Paper Luster
|
||
|
Premium Photo Paper Glossy
|
||
|
Epson Premium Photo Paper Semi-gloss
|
Premium Photo Paper Semi-Gloss
|
|
|
Premium Presentation Paper Matte
|
||
|
Presentation Paper Matte
|
Note:
Print quality may decline in the top and bottom areas of the printout, or the area may be smeared when you print on papers other than those listed above. Print a single sheet to check the quality before printing large jobs.
Print quality may decline in the top and bottom areas of the printout, or the area may be smeared when you print on papers other than those listed above. Print a single sheet to check the quality before printing large jobs.
With proper care, photographs from your Epson Stylus printer will last for many years. The special Epson Claria inks designed for your printer provide the ultimate combination of photo quality and longevity when used with Epson papers for prints that are properly displayed or stored. For best results, always use Epson papers.
As with traditional photos, Epson recommends proper care that will minimize color changes and lengthen display life:
|
•
|
Frame prints under glass or a protective plastic sleeve to protect them from atmospheric contaminants like humidity, smoke, and high levels of ozone.
|
|
•
|
For proper storage, keep your prints in a photo album or plastic photo storage box in acid-free, archival sleeves commonly available from most camera stores.
|
You can purchase genuine Epson ink and paper at Epson Supplies Central at www.epson.com/ink3 (U.S. sales) or www.epson.ca (Canadian sales). You can also purchase supplies from an Epson authorized reseller. To find the nearest one, call 800-GO-EPSON (800-463-7766).
You can print your photos from an imaging application or you can use the Windows Photo Gallery in Windows Vista.
|
2.
|

|
3.
|
|
4.
|
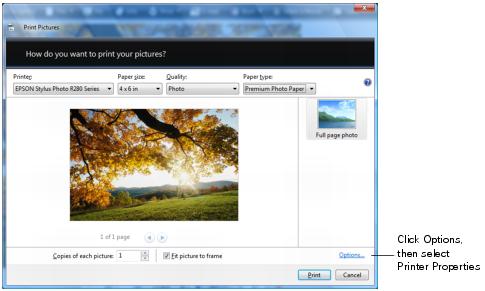
Make sure your printer is selected, then choose the size and type of paper that you loaded in the printer.
|
|
5.
|
|
6.
|
When you see your printer’s properties window, select Photo as the Quality Option setting.
|
|
7.
|
|
8.
|
Click the Advanced tab.
|
|
9.
|
Click PhotoEnhance to turn on Auto Photo Correction. This feature includes advanced face detection, which corrects for the proper light exposure to faces. For example, it removes any green that might appear due to fluorescent lighting.
|
|
10.
|
Click the Page Layout tab.
|
|
11.
|
If necessary, adjust the Expansion slider in the Borderless box to choose Max, Min, or the in-between setting.
|
Min retains the entire image in your print, but there may be a small white edge on the borders of the print. Max expands the image to ensure that there are no unprinted edges, but the edges of the image may not appear in the print.
|
12.
|
Click OK.
|
You can print your photos from an imaging application or you can use the Picture and Fax Viewer in Windows XP.
|
2.
|

|
4.
|
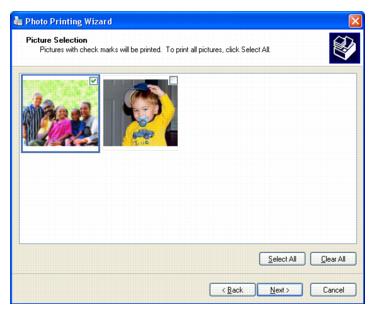
Click Next. You see a Picture Selection window:
|
|
5.
|
Select the photo(s) you want to print and click Next. You see the Printing Options window:
|
|
6.
|
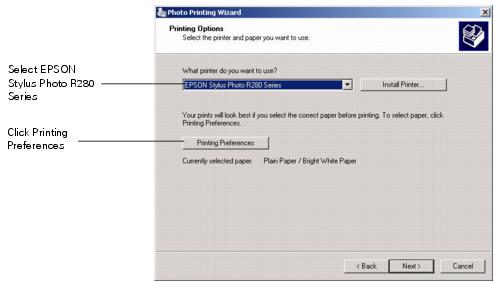
Select EPSON Stylus Photo R280 Series and click Printing Preferences. You see a window like this one:
|

|
7.
|
Select Photo as the Quality Option setting.
|
|
9.
|
|
10.
|
Select your paper Size setting to match the paper you’re using. See the list of supported borderless sizes in Choosing Paper for Borderless Photos.
|
|
11.
|
|
12.
|
Click the Page Layout tab. You see a window like this one:
|

|
13.
|
If necessary, adjust the Expansion slider in the Borderless box to choose Max, Min, or the in-between setting.
|
Min retains the entire image in your print, but there may be a small white edge on the borders of the print. Max expands the image to ensure that there are no unprinted edges, but the edges of the image may not appear in the print.
|
14.
|
Click OK.
|
|
15.
|
At the Photo Printing Wizard screen, click Next. You see a Layout Selection window:
|

|
16.
|
|
1.
|
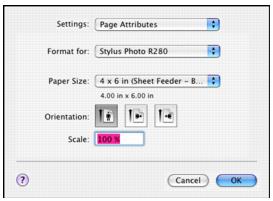
Open the File menu and select Page Setup. You see a window like this one:
|
|
2.
|
Select Stylus Photo R280 in the Format for pop-up menu.
|
|
5.
|
Click OK.
|
|
6.
|
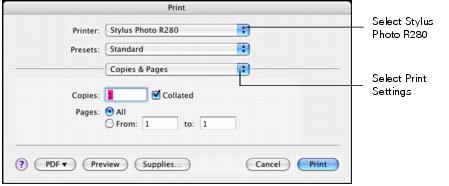
Open the File menu and select Print. You see a window like this one:
|
|
7.
|
Select Stylus Photo R280 in the Printer pop-up menu.
|
|
8.
|
Select Print Settings from the pop-up menu.
|

|
10.
|
|
11.
|
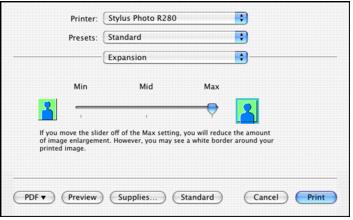
Select Expansion from the pop-up menu. You see a window like this one:
|
|
12.
|
Min retains the entire image in your print, but there may be a small white edge on the borders of the print. Max expands the image to ensure that there are no unprinted edges, but the edges of the image may not appear in the print.
|
13.
|
Click Print.
|