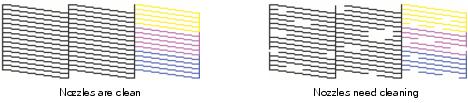
If print quality has declined and the nozzle check pattern indicates clogged nozzles, you can clean the print head.
Note:
You cannot clean the print head if an ink cartridge is expended, and may not be able to clean it when a cartridge is low. You must replace the cartridge first.
You cannot clean the print head if an ink cartridge is expended, and may not be able to clean it when a cartridge is low. You must replace the cartridge first.
|
1.
|
Load a few sheets of plain paper in the sheet feeder.
|
|
2.
|
Hold down the
|
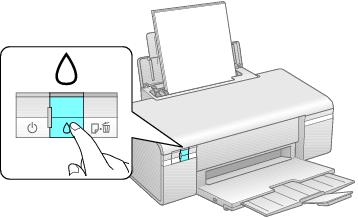
The  power light flashes throughout the cleaning cycle and stays on green when the cycle is finished.
|
3.
|
Run a nozzle check to confirm that the print head is clean.
|
You may need to clean the print head up to 4 times. You can also turn the WorkForce 30 Series off and wait at least 6 hours. Then try printing again.
|
1.
|
Load a few sheets of plain paper in the sheet feeder.
|
|
2.
|
Windows: Right-click the
|
Macintosh: Open the Applications folder, open the EPSON Printer Utility3, select WF 30 Series, and click OK. Then select Head Cleaning.
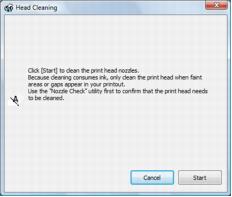
The  power light flashes throughout the cleaning cycle and stays on green when the cycle is finished.
|
4.
|
When the
|
|
6.
|
If there are no gaps, click Finish.
|
If there are gaps or the pattern is faint, click Clean to clean the print head again.
You may need to clean the print head up to 4 times. You can also turn the WorkForce 30 Series off and wait at least 6 hours. Then try printing again.