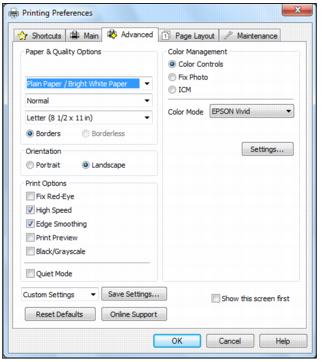
Click the Advanced tab on the top of the printer settings window to select Advanced options.
|
1.
|
Select the paper type setting that matches the paper you loaded.
|
|
2.
|
Select the print quality setting for your document or photo, such as Fast Economy for the fastest printing or Best Photo or Photo RPM® (Max dpi) for the best print quality.
|
|
3.
|
Select the paper size setting for the paper you loaded. User Defined and custom options are also available so you can create a custom size.
|
|
4.
|
If you’re printing borderless photos, select Borderless. For documents or photos with borders, select Borders.
|
|
5.
|
Choose Portrait or Landscape orientation for your document or photo. (Choose Landscape for printing envelopes.)
|
|
6.
|
Select any of the Print Options you want for your document or photo.
|
|
7.
|
Select Color Management options for finer control of the color in your document or photo.
|
|
•
|
Save all your selected settings for later use (click Save Settings and name the settings); to use saved settings later, select them from the Custom Settings list or from the Shortcuts tab.
|
|
•
|
Return to the default settings (click Reset Defaults).
|
|
•
|
Access the Epson product support website (click Online Support).
|