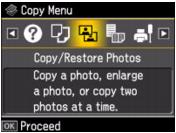
You can copy photos onto 4 × 6-inch, 5 × 7-inch, 8 × 10-inch, or letter-size Epson special paper (various types available) for instant photo reprints. You can restore the colors in faded photos, convert color photos to black-and-white, and crop your photos.
|
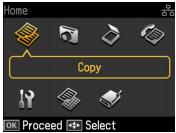
1.
|
Load Epson photo paper in the sheet feeder.
|
|
2.
|
|
3.
|
Press OK.
|
|
4.
|
|
5.
|
Press OK.
|
|
6.
|
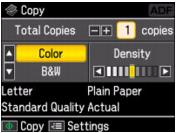
To turn on Color Restoration to restore colors in faded photos as you copy, press
|
|
7.
|
Press OK.
|
|
8.
|
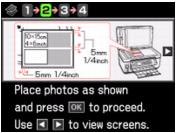
Place your original photos on the scanner glass.
|
|
9.
|
When you see this screen, press OK to start scanning your photos.
|
|
11.
|
|
12.
|
To crop a photo and enlarge the resulting image area to fit onto your paper, press Display/Crop. After you finish cropping, press OK.
|
|
13.
|
If you placed two photos on the scanner glass, press
|
|
15.
|
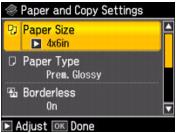
To change any of the settings displayed on the screen, press Menu. Then press
|
|
•
|
To change the paper size, press
|
|
•
|
To change the paper type, press
|
|
•
|
To change the print layout, press
|
Choose On to expand the image all the way to the edge of the paper (slight cropping may occur) or Off to leave a small margin around the image.
|
•
|
To adjust the amount of image expansion when printing borderless photos, press
|
|
•
|
If you want to create a black-and-white copy of a color photo, press
|
|
17.
|
Press
|
To cancel copying, press  Stop/Clear Settings.