You should enter your header and time information before sending a fax so that recipients can identify the source and the time it was sent. See the following:
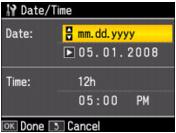
Before setting the date and time, you should select the appropriate Daylight Saving Time setting for your region. This setting lets you easily set the clock one hour ahead or one hour back when the time change takes place.
|
1.
|
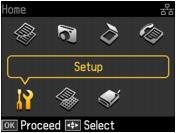
Press the Home button.
|
|
2.
|
Press
|
|
3.
|
Press OK.
|
|
4.
|
|
5.
|
|
6.
|
Press
|
Note:
When you change the setting from Winter to Summer, the clock is automatically set ahead by one hour. When you change it from Summer to Winter, the clock is set back. The setting is not automatic; you need to change it each season.
When you change the setting from Winter to Summer, the clock is automatically set ahead by one hour. When you change it from Summer to Winter, the clock is set back. The setting is not automatic; you need to change it each season.
|
7.
|
|
1.
|
|
6.
|
|
7.
|
Press OK. You return to the Printer Setup menu.
|
|
1.
|
Press the Home button.
|
|
2.
|
Press
|

|
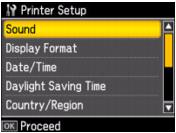
3.
|
Press OK.
|
|
4.
|

|
5.
|
|
6.
|

|
7.
|
Use the numeric keypad to enter the header information. You can enter up to 40 digits.
|
|
8.
|
Press OK. You return to the Header menu.
|
|
1.
|
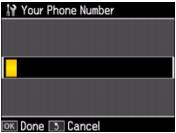
Select Your Phone Number from the Header menu, then press OK. You see the phone number input screen.
|
|
2.
|
Use the numeric keypad to enter your phone number. You can enter up to 20 digits.
|
Note:
When entering a phone number, the * button does not work. Use the # button to type the + symbol for an international number, such as +81 to dial a number in Japan.
When entering a phone number, the * button does not work. Use the # button to type the + symbol for an international number, such as +81 to dial a number in Japan.
|
3.
|
Press OK. You return to the Header menu.
|