|
1.
|
|
2.
|
|
3.
|
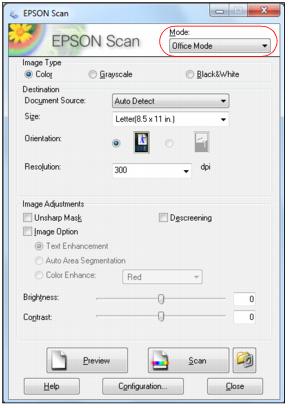
Select where you placed your originals as the Document Source setting. Select Auto Detect to locate the originals automatically, ADF - Single-sided or ADF - Double-sided (for documents placed in the Automatic Document Feeder), or Document Table (for documents placed on the scanner glass).
|
|
4.
|
|
5.
|
Select the desired scanning Resolution.
|
Select your Resolution based on how you will use the scanned image:
E-mail, view on a computer screen, or post on the web: 96 to 150 dpi
Fax: 200 dpi
|
6.
|
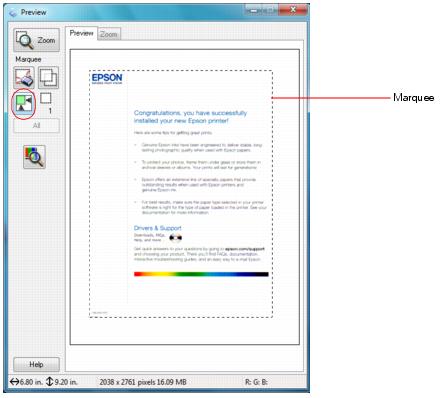
Click the Preview button. Epson Scan previews your document and displays it in the Preview window.
|
If you’re using the Automatic Document Feeder, the preview scans the first page and ejects it. Place the page back on top of the other pages and reload them in the feeder.
|
7.
|
If desired, you can draw a marquee (or box) around the area you want to scan in the Preview window.
|
|
8.
|
Adjust the image quality, if necessary.
|
|
9.
|
Now you can view and print the image.
You can adjust the scanned image area by creating and/or moving the dotted line (marquee) outlining the scan area:
|
1.
|
Click the
|
|
3.
|
To resize a marquee, place the cursor over a marquee edge or corner, then click and drag the edges where you want them.
|
|
4.
|
You can create up to 50 marquees at a time. Click the
|
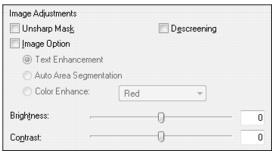
You can adjust exposure, brightness, and other image quality settings before you scan to improve your results. Before making adjustments, be sure to click the image or marquee for the area you want to adjust.
|
Turn on to make the edges in different areas of your image clearer. Turn off to leave softer edges.
|
|
|
Removes the rippled pattern that can appear in subtly shaded image areas, such as in skin tones. Also improves results when scanning magazine or newspaper images. The results of descreening do not appear in the preview image, only in your scanned image.
|
|
|
Text Enhancement
|
Adjusts the level at which the black areas in text and line art are delineated, improving text recognition in OCR programs. Check the Image Option box and then select the setting.
|
|
Auto Area Segmentation
|
Makes grayscale images clearer and text recognition more accurate by separating the text from the graphics. (Available only when you select Black&White as the Image Type.) Check the Image Option box and then select the setting.
|
|
Enhances red, green, or blue shades in the scan. (Available when you select Grayscale or Black&White for the Image Type setting.) Check the Image Option box and then select the setting.
|
|
|
1.
|
Click Scan.
|

Note:
If you started your scan from within a TWAIN-compatible scanning program, your scanned images open in the program window. Click Close to exit Epson Scan.
If you started your scan from within a TWAIN-compatible scanning program, your scanned images open in the program window. Click Close to exit Epson Scan.
|
2.
|
Select the scan file settings you want to use from the window that appears.
|
|
3.
|
Click OK.
|
|
5.
|
Now you can view and print your scanned images, attach them to an e-mail, or use them however you like.
|