- Open a photo or document for printing.
- Select the print command in your application.
Note: You may need to select a print icon on your screen, the Print option in the File menu, or another command. See your application's help utility for details.
- Select your product as the Printer setting.
- If necessary, click the arrow next to the Printer setting
or the Show Details button to
expand the print window. You see the expanded printer
settings window for your product:
Note: The print window may look different, depending on the version of OS X and the application you are using.
- Select the Copies and
Pages settings as
necessary.
Note: If you do not see these settings in the print window, check for them in your application before printing.
- Select the page setup options: Paper Size and Orientation.
Note: If you do not see these settings in the print window, check for them in your application before printing. They may be accessible by selecting Page Setup from the File menu.
- Select any application-specific settings that appear on the screen, such as those shown in the image above for the Preview application.
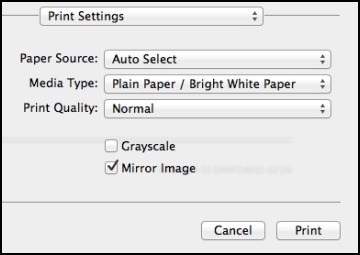
- Select Print Settings from the pop-up menu. You see these settings:
- Select the Paper Source you wish to print from.
- Select the type of paper you loaded as the Media Type setting.
Note: The setting may not exactly match the name of your paper. Check the paper type settings list for details.
- Select the Print Quality setting you want to use.
- Select any of the available print options.