Adjusting Keystone with the Control Panel

You 
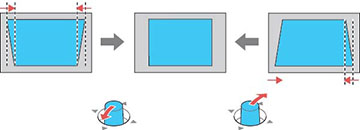
can use the projector's thumbstick on the control panel to correct the shape of an image that is unevenly rectangular on the sides.
Note: To provide the best possible image quality, adjust the projector's position to correct the image shape. If this isn't possible, use keystone correction to correct the image shape.
Note: Keystone corrections are most effective within a projection angle of 30° from top to bottom.
  1. Turn on the projector and display an image.
    Note: You can display a pattern to aid in adjusting the projected image using the Settings menu.
    Note: You can also display the pattern by pressing the Pattern button on the remote control.
  2. Move the thumbstick on the control panel up or down to display the keystone adjustment sliders, then continue moving the thumbstick up or down to adjust the image shape.


  3. Push in the thumbstick on the control panel to set the keystone value. After correction, your image is slightly smaller.
    Note: If the projector is installed out of reach, you can also correct the image shape with the remote control using the Keystone settings in the projector menus.
Related references
Projector Feature Settings - Settings Menu