Settings on the Extended menu let you customize various projector setup features that control its operation.
Easy Interactive Function Settings
| Setting | Options | Description |
|---|---|---|
| General Easy Interactive Function settings | ||
| Auto Calibration
Manual Calibration |
— | Auto Calibration and Manual Calibration: start calibration for pen operations |
| Touch Unit Setup
(BrightLink 595Wi+) |
Installation
Pattern
Power Angle Adjustment Touch Calibration |
Selects settings for the Touch unit
Installation Pattern: displays reference points to help you determine the installation position of the Touch Unit Power: turns on the Touch Unit power Angle Adjustment: performs angle adjustment for laser diffusion Touch Calibration: performs calibration for finger touch operations |
| Pen Mode | PC Free
Annotation
PC Interactive |
Selects the mode for the interactive pens |
| Hovering | On
Off |
Turns the pen hovering feature on and off; when set to On, the pointer follows the pen tip as you hover it over the screen and move it around. |
| Advanced | Distance of
Projectors
Sync of Projectors Wired Sync Mode Pen Button Function Confirm Clear Screen Color Palette |
Selects various settings for interactive
features
Distance of Projectors, Sync of Projectors, and Wired Sync Mode: let you adjust features for using multiple projectors of the same model in the same room Pen Button Function: sets the pen to act as an eraser Confirm Clear Screen: lets you display a confirmation screen before clearing all of the content Color Palette: lets you choose a different palette if certain colors are difficult to see |
| PC Interactive Easy Interactive Function settings | ||
| Pen Operation Mode | Mode 1
Mode 2 Mode 3 |
Selects the operating system version for pen
operations
Mode 1: when using Windows XP or earlier Mode 2: when using OS X, or Windows Vista or later Mode 3 : when using Linux |
| Enable Right Click | On
Off |
Lets you use a long pen press or finger press (BrightLink 595Wi+) as a right-click operation when using mouse mode |
| Advanced | Pen Tip Button
Auto Adjust Pen Area Manual Adj. Pen Area |
Let you select pen operation and adjustment
options
Pen Tip Button: assign either Right Click or Left Click to the pen tip button Select either Auto Adjust Pen Area or Manual Adj. Pen Area as the pen area adjustment option |
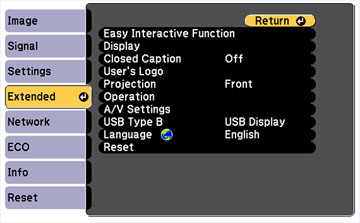
Other Extended Settings
| Setting | Options | Description |
|---|---|---|
| Display | Messages
Display Background Startup Screen A/V Mute Toolbars Pen Mode Icon Projector Control |
Selects various display options
Messages: controls whether messages are displayed on the screen Display Background: selects the screen color or logo to display when no signal is received Startup Screen: controls whether a special screen appears when the projector starts up A/V Mute: selects the screen color or logo to display when A/V Mute is turned on Toolbar Tab: controls whether the tab is always displayed in annotation mode Pen Mode Icon: controls the display and position of the pen icon in interactive computer mode Projector Control: controls where the projector control toolbar is displayed on the screen |
| Closed Caption | Off
CC1 CC2 |
Controls use of closed captions and selects the closed caption type (closed captions are only visible for NTSC signals connected through the S-Video or Video ports) |
| User's Logo | – | Creates a screen that the projector displays to identify itself and enhance security |
| Projection | Front
Front/Upside Down Rear Rear Upside Down |
Selects the way the projector faces the screen so the image is oriented correctly |
| Operation | Direct Power On
High Altitude Mode Startup Source Search Monitor Out Port |
Selects various operation options
Direct Power On: lets you turn on the projector without pressing the power button High Altitude Mode: regulates the projector’s operating temperature at altitudes above 4921 feet (1500 m) Startup Source Search: automatically detects the image signal that is input when the projector is turned on Monitor Out Port: specifies the function of the Monitor Out/Computer2 port |
| A/V Settings | A/V Output
Audio Output HDMI1 Audio Output HDMI2 Audio Output |
Selects the following when the projector is in
standby mode (turned off):
A/V Output: The Always On setting indicates that the projector output audio and video signals even while it is standby mode. This setting is only available when Standby Mode is set to Communication On. Audio Output: Selects the audio input port when projecting images from the Computer1, Computer2, S-Video, Video, and USB-A ports. HDMI1 Audio Output and HDMI 2 Audio Output: Selects which Audio port provides audio output when viewing images from the HDMI 1 and HDMI 2 ports on the projector. |
| USB Type B | Easy Interactive
Function
USB Display/Easy Interactive Function Wireless Mouse/USB Display |
Selects what happens when you connect your
computer to the projector's USB-B
port
Easy Interactive Function: lets you use the interactive pens with your computer USB Display/Easy Interactive Function: lets you display your computer's image through the USB port and use the interactive pens with your computer Wireless Mouse/USB Display: lets you use the wireless mouse feature and display your computer's image through the USB port (interactivity not available) |
| Language | Various languages available | Selects the language for projector menu and message displays (not changed by Reset option) |