- Make sure you installed the product software and connected
the product to your computer or network.
Note: Restart your computer after installing the product software to enable scanning from the control panel. Also make sure the Event Manager program is not being blocked by your firewall or security software.
- Place your original on the product for scanning.
Note: To scan a double-sided document, place it in the ADF and select the 2-Sided setting.
- Press the
 home button, if
necessary.
home button, if
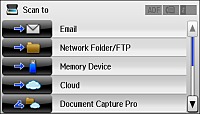
necessary. - Select Scan. You see a screen like this:
- Select one of the following Scan to options:
- Email lets you send scanned files through a pre-configured email server.
- Network Folder/FTP saves your scan file to a specified folder on a network.
- Memory Device saves your scan file on a memory or USB device and lets you select the file format, quality, and other settings.
- Cloud sends your scanned files to a destination that you have registered with Epson Connect.
- Document Capture Pro allows you to scan over
a network using your saved job settings in Document Capture Pro or
Document Capture.
Note: You cannot use this option to scan an image to Document Capture or Document Capture Pro when your product is connected to your computer's USB port.
- Computer (WSD) lets you manage network scanning in Windows 8.x, Windows 7, or Windows Vista (English only). To use this feature, you must first set up WSD (Web Services for Devices) on the computer.
- Select Preset to save
your scan settings.
Note: Presets can be locked by an administrator. If you cannot access or change this setting, contact your administrator for assistance.
- Do any of the following, as necessary: