You can
select or change wireless network settings using your product
control panel.
To install your product on a wireless network, follow the instructions on the Start Here sheet and install the necessary software. The installer program guides you through network setup.
- Press the
 home button, if
necessary.
home button, if
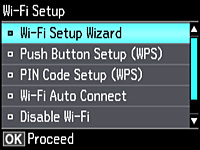
necessary. - Press the arrow buttons to select Wi-Fi Setup and press the OK button. You see this screen:
- Select Wi-Fi Setup Wizard and press the OK button.
- Do one of the following:
- Press the OK button to select the wireless network displayed.
- Press the
 cancel button to select a
different wireless network. Press the up or down arrow buttons to
select the name of your wireless network and press the OK button. If you do
not see your wireless network's name, you can enter it manually.
Note: To enter the wireless network name manually, select Other Networks and press the OK button. Enter your network name as described in the next step.
cancel button to select a
different wireless network. Press the up or down arrow buttons to
select the name of your wireless network and press the OK button. If you do
not see your wireless network's name, you can enter it manually.
Note: To enter the wireless network name manually, select Other Networks and press the OK button. Enter your network name as described in the next step.
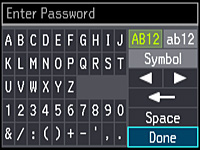
- If you see the following screen, enter your wireless
password (or network name and then password).
- Press the arrow buttons to highlight a character or a function button displayed on the keypad. Then press the OK button to select it.
- To change the case of letters or select symbols, select AB12 (uppercase), ab12 (lowercase), or Symbol and press the OK button. Then highlight a number or symbol and press the OK button to select it.
- To enter a space, select Space and press the OK button.
- To delete characters, select the back arrow and press the OK button.
- When you finish entering characters, select Done and press the OK button.
- Press the OK button to confirm wi-fi settings.
- Select Yes if you want
to print a network status report, or No if not, and press the OK button.
Your product should now be connected to the network.
Note: If the WiFi connection symbol isn't lit or does not appear on the LCD screen, you may have selected the wrong network name or entered the password incorrectly. Repeat these steps to try again.