- Click
Next, then click Print to print an alignment sheet.
Note: Do not cancel printing while you are printing a head alignment pattern.You see a window like this:
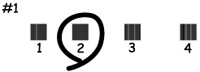
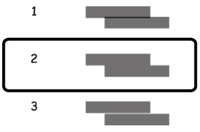
- Check
the printed pattern and follow the instructions on the screen to
choose the number representing the best printed pattern for each
set.
Vertical alignment
Horizontal alignment
- After choosing each pattern number, click Next.
- If no patterns are aligned in one or more of the sets, choose the closest one in each set and click Realignment. Then print another alignment sheet and check it.
Note: Click Skip (where available) if you want to skip a particular alignment sheet.