Make sure
you have your replacement cartridges handy before you begin. You
must install new cartridges immediately after removing the old
ones.
Caution:
Leave your old cartridges in the printer until
you are ready to replace them to prevent the print head nozzles
from drying out. Do not open ink cartridge packages until you are
ready to install the ink. Cartridges are vacuum packed to maintain
reliability.
- Open the
inner cover.
Caution:Do not move the print head by hand; otherwise, you may damage your product. Do not touch the flat white cable inside the printer.
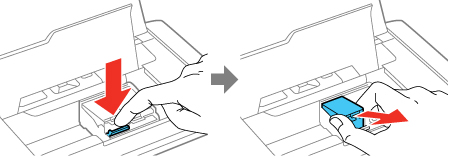
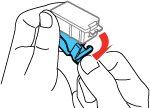
- Push in
the blue tab to unlock the ink cartridge you are replacing. Then
lift the bottom of the ink cartridge to remove it.
Warning: If ink gets on your skin, wash it thoroughly with soap and water. If ink gets into your eyes, flush them immediately with water. If ink gets into your mouth, spit it out and see a doctor right away. Keep ink cartridges out of the reach of children.
- Recap
the used ink cartridge using the cap that came with it.
Note: Dispose of used cartridges carefully. Do not take the used cartridge apart or try to refill it.
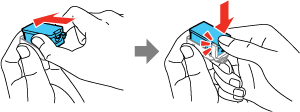
- Remove
the cartridge from the package and remove the yellow tape.
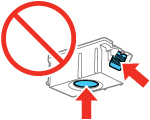
Caution:Do not touch the areas shown below. Doing so may prevent normal operation and printing.
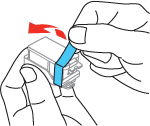
- Remove
the cap from the cartridge and store it for later use.
Note: Save the cap so you can recap ink cartridges before storing or disposing of them.Caution:Do not remove any other labels or seals, or ink will leak.
- Insert the ink cartridge at a slight angle into the ink cartridge holder as shown. Then press the bottom of the ink cartridge down until it clicks into place.

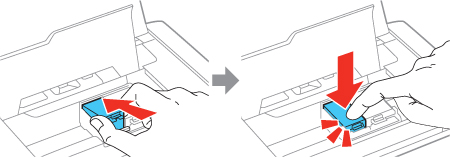
If you remove a low or expended ink cartridge, you cannot re-install and use the cartridge.
Caution:
If you remove an ink cartridge for later use,
recap the ink cartridge using the cap that came with it to prevent
the ink from drying out and to protect the surrounding area from
getting smeared by ink. Store the ink cartridge in the same
environment as the product. Do not leave the product with the ink
cartridges removed for an extended period of time. Otherwise, ink
remaining in the print head nozzles may dry out and you may not be
able to print.