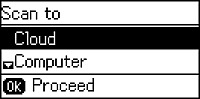
You can scan
an image using your product's control panel buttons.
Your product automatically selects suitable default scan
settings, but you can view or change them as necessary.
Make
sure you installed the product software and connected the product
to your computer or network.
Press
the up or down arrow button, select Scan, and press the OK button. The scan options are
displayed:
Press
the up or down arrow button to select a scan option and press the
OK button.
Cloud sends your scanned files to a destination
that you have registered with Epson Connect.
Computer saves your scan as a JPEG file to your
computer or as an image capture in OS X.
Computer (WSD) lets you manage network scanning
in Windows 7 or Windows Vista (English only).
Note: To use this
feature, you must first set up WSD (Web Services for Devices) on
the computer you want to scan to.
To scan
to your computer, you first need to select how you connected your
product to your computer:
If your
product is connected directly to your computer with a USB cable,
press the up or down arrow button to select USB Connection.
If your
product is connected to your computer over a network, press the up
or down arrow button to select the computer name from the list and
press the OK button to
begin scanning.