- Load a few sheets of plain paper in the product.
- Press the arrow buttons to select Menu and press the OK button.
- Select Maintenance and press the OK button.
- Select Print Head Alignment and press the OK button.
- Do one of the following:
- Press the up arrow button to print an alignment
sheet.
Note: Do not cancel printing while you are printing head alignment patterns.
- Check the printed patterns on the alignment sheet and do
one of the following:
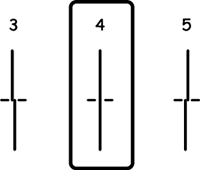
- If you printed a ruled line alignment sheet, select the number representing the pattern with the least misaligned vertical line.
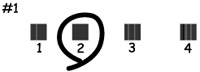
- If you printed a vertical alignment sheet, select the number representing the most solid printed pattern for each set on the LCD screen.
- If you printed a horizontal alignment sheet, select the number representing the pattern with the least amount of separation or overlap on the LCD screen.
- After you have selected the number for all the sets, press the OK button.