- Press the
 home button, if
necessary.
home button, if
necessary. - Select Print Photos.
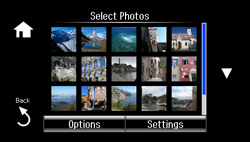
- Do one of the following to select your photos:
- To select
individual photos, select the thumbnail image of the photo you want
to print, then press the + or
– button to select the number of
copies (up to 99). Press the left or right arrow button to scroll
through and select additional photos, or press the
 Back button to return to the thumbnail
image view and select another photo.
Back button to return to the thumbnail
image view and select another photo. - To select all photos, select Options > Select Photos > Select All Photos, then press the + or – button to select the number of copies (up to 99). Select Done when finished.
- To select photos based on the date they were taken, select Options > Browse > Browse by Date, then select any of the dates shown. Select Proceed, select the thumbnail, then press the + or – button to select the number of copies (up to 99).
- To select
individual photos, select the thumbnail image of the photo you want
to print, then press the + or
– button to select the number of
copies (up to 99). Press the left or right arrow button to scroll
through and select additional photos, or press the
- To adjust your photos, do either of the following as
necessary (adjustments modify only your printed copy, not the
original file):
- To crop, zoom into, or rotate a photo, select the thumbnail image of the photo you want to modify, then select Edit > Crop/Zoom. Make the necessary adjustments, select the OK button, then select the OK button again to confirm your changes.
- To change the
appearance (e.g., brightness and contrast) of your printed photos,
select the thumbnail image of a photo, select Edit > Photo
Adjustments, and select the necessary settings. When you are
finished, press the Back button twice.
- To change a
photo to black and white or add a sepia (brown) effect, select the
thumbnail image of a photo, select Edit >
Filter, and select the necessary setting. When you are
finished, press the Back button twice.
- To change the print settings, select Settings, then select the necessary settings.
When you are finished, press the Back button.
- When you are ready to print, press the
 Start button.
Note: To cancel printing, select Cancel.
Start button.
Note: To cancel printing, select Cancel.