You can
restore the colors in faded photos as you copy them.
Place your original document or photo
on the product.
Load
photo paper in the product.
Press
the home button, if
necessary.
Press the left or right arrow button, select
More Functions, and press the
OK
button.
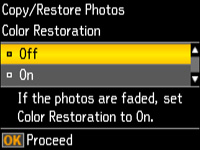
Select
Copy/Restore Photos and press the
OK button. You
see this screen:
Press
the down arrow button to select On
and press the OK
button.
Place up
to two original photos on the product.
Note: Press the up
or down arrow button for instructions on placing your photos on the
product.
Press
the start button. You see this
screen:
Press
the left or right arrow button to scroll through your photos and
display one that you want to copy.
Press
the + or
– button to select one
or more copies of the photo (up to 99).
If you
placed two originals on the scanner, press the left or right arrow
button to view the second original, then press the
+ or – button to select one or more copies of
the photo (up to 99).
To
select settings for the photos, press the down arrow button.
You see this screen:
Do one
of the following:
To change the
display setting for the LCD screen, select Display Options, press the OK button, and select the setting you
want.
To change the
print settings, select Print
Settings, press the OK button, and select the necessary
settings.
To crop or
zoom into your photo, select Crop/Zoom, press the OK button, and press the arrow buttons
and the + or
– button to adjust the
selection area and location.
When you
are ready to print, press the start button.