Checking the Nozzles Using the Product Control Panel

You can check the print head nozzles using the control panel on your product.
  1. Load a few sheets of plain paper in the product.
  2. Press the  home button, if necessary.
  3. Press the arrow buttons to select Setup and press the OK button.
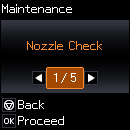
  4. Press the arrow buttons to select Maintenance and press the OK button. You see this screen:


  5. Press the OK button.
  6. Press the  start button. The nozzle
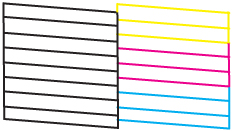
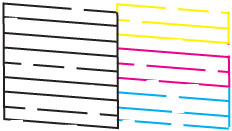
 check pattern is printed.
  7. Check the printed pattern to see if there are gaps in the lines.

    Print head is clean


    Print head needs cleaning


  8. Do one of the following:
    • If there are no gaps, select No and press the OK button. Press the  stop button to exit.
    • If there are gaps or the pattern is faint, select Yes and press the OK button to continue. Follow the instructions on the screen to clean the print head, check the nozzles, and repeat the process as necessary.

If you don’t see any improvement after cleaning the print head up to 3 times, turn the product off and wait at least 12 hours. Then check the print head nozzles and try cleaning the print head again, if necessary. If quality still does not improve, contact Epson.

Was this page helpful? Yes or No.
Privacy Policy | Your California Privacy Rights | Terms of Use