You can scan
an image to your computer using your product's control panel
buttons.
Your product automatically selects suitable default scan settings, but you can view or change them as necessary.
- Make sure you installed the product software and connected
the product to your computer or network.
Note: Restart your computer after installing the product software to enable scanning from the control panel. Also make sure the Event Manager program is not being blocked by your firewall or security software.
- Press the
 home button, if
necessary.
home button, if
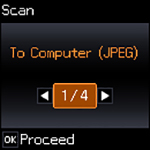
necessary. - Press the arrow buttons to select Scan and press the OK button. The scan options are displayed:
- Press the arrow buttons to select a scan option and press
the OK
button.
- To Computer (JPEG) saves your scan file directly to your computer.
- To Computer (PDF) saves your scan as a PDF file to your computer.
- To Computer (Email) scans your original and
attaches it to a message in your e-mail program. You can select the
e-mail program you want to use and resize your image, if necessary,
from an option screen on your computer.
Note: This works with MAPI-type email such as Microsoft Outlook, Windows Live Mail, Mac Mail, and Entourage, but not web-based email such as Gmail.
- To Computer (WSD) lets you manage network
scanning in Windows 8.x, Windows 7, or Windows Vista (English
only).
Note: To use this feature, you must first set up WSD (Web Services for Devices) on the computer you want to scan to.
- Press the arrow buttons to select how you connected your product to your computer:
- Press the
 start button to start
scanning.
start button to start
scanning.