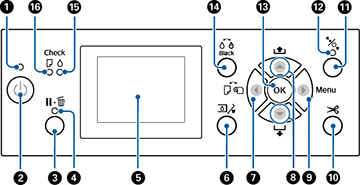
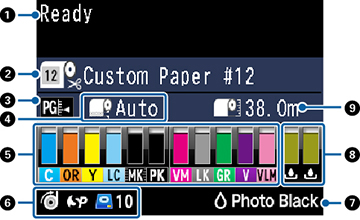
| 1 |
Status messages |
| 2 |
Paper source and the selected Paper Type
The icon indicates the current paper source settings. The
selected Paper Type is listed to the right of the icon.
 : Roll paper with Auto Cut
enabled : Roll paper with Auto Cut
enabled
 : Roll paper with Auto Cut
disabled : Roll paper with Auto Cut
disabled
 : Cut sheet paper : Cut sheet paper
|
| 3 |
Platen gap setting
 : Standard : Standard
 : Narrow : Narrow
 : Wide : Wide
 : Wider : Wider
 : Widest : Widest
|
| 4 |
Roll paper margin setting |
| 5 |
Ink status
 : Amount of ink remaining in
the cartridge : Amount of ink remaining in
the cartridge
 : Ink level is low : Ink level is low
 : Ink cartridge is expended : Ink cartridge is expended
 : Ink error; check the status
message on the LCD screen : Ink error; check the status
message on the LCD screen
|
| 6 |
Optional accessory status (if applicable)
 : Auto-Take Up Reel
(SC-P8000/SC-P9000 only) : Auto-Take Up Reel
(SC-P8000/SC-P9000 only)
 : SpectroProofer® : SpectroProofer®
 : Optional Internal Print
Server is installed : Optional Internal Print
Server is installed
 : Optional Internal Print
Server is being accessed : Optional Internal Print
Server is being accessed
|
| 7 |
Photo Black or Matte Black ink selected
Press the  Black ink button to switch cartridge
types Black ink button to switch cartridge
types |
| 8 |
Maintenance box status
 : Amount of space remaining in
the maintenance box : Amount of space remaining in
the maintenance box
 : Maintenance box is nearing
the end of its service life : Maintenance box is nearing
the end of its service life
 : Maintenance box is
full : Maintenance box is
full
|
| 9 |
Roll paper remaining |