Adjusting Media Feed and Head Alignment

You can perform media feed and head alignment adjustments using the Media Adjust setting in the Media Setup menu. Use this setting only after trying both of the following first to correct printout issues:
  1. Set up your printer to use the same media type and print conditions you use for printing.
  2. Press the Menu button.
  3. Select Media Setup and press the OK button.
  4. Press the up or down arrow button to select Customize Settings and press the OK button.
  5. Press the up or down arrow button to select Media Adjust and press the OK button.
  6. Do one of the following:
    • If you want the product to automatically perform feed adjustment and head alignment, select Auto, press the OK button, and skip the remaining steps.
      Note: You need approximately 10.6 inches (270 mm) of media to print the test pattern. This option is not available when Film, Canvas, Textile, or Paper/Others is selected for the Media Type setting.
    • If you want to manually perform feed adjustments and head alignment, select Manual, press the OK button, and continue with the next step.
  7. To correct banding in your printouts, select Feed Adjustment and press the OK button.
  8. Select one of the following:
    • Standard: Select this option for most media.
      Note: You need approximately 5.1 inches (130 mm) of media to print the test pattern. This option is not available when Textile is selected for the Media Type setting.
    • 500mm Pattern: Select this option when printing on uneven media (such as canvas) or on media that bleeds through easily (such as cloth) and accurate print adjustments are required.
      Note: You need approximately 30.3 inches (770 mm) of media to print the test pattern.
  9. Press the OK button and wait for the adjustment pattern to finish printing.
  10. Do one of the following depending on the type of adjustment pattern printed:
    • Standard: Check the pattern for group A and B and identify the pattern with the least amount of overlap or gap for each group. Press the up or down arrow button to select the value for the pattern you identified from group A and press the OK button. Press the up or down arrow button to select the value for the pattern you identified from group B and press the OK button.


      Note: If you cannot decide between two patterns, select a value halfway between the two patterns. For example, select –0.05% if your adjustment pattern looked like the following:


    • 500mm Pattern: Measure the distance between the + symbols in millimeters. Select the distance you recorded on the control panel and press the OK button.


    he home screen is displayed when feed adjustment is complete.
  11. Press the Menu button and select Media Setup > Customize Settings > Media Adjust > Manual > Head Alignment.
  12. Press the OK button to print the adjustment pattern. Wait for the pattern to finish printing.
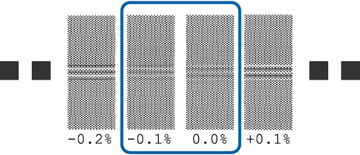
  13. Check the printed patterns and identify the pattern with the least amount of gap between the lines in each group.


  14. Press the up or down arrow button to select the value you identified in the previous step and press the OK button. Repeat for each group.
  15. Press the up or down arrow button to select the number of the media settings you selected for the currently loaded media. Then press the OK button. The Media Setup screen is displayed when head alignment is complete.