Loading Poster Board

Load poster board that is more than 31 mil (0.8 mm) thick into the front of the printer using the poster board support.
  1. Make sure the printer is turned on and the roll paper cover is closed.
  2. Press the  load/remove paper button.
  3. Select Poster Board and press the OK button.
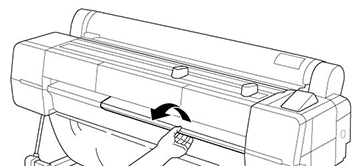
  4. Lift up the poster board support and pull it toward you.


  5. Insert the poster board printable side up.
    Note: Make sure the poster board passes under the rollers in the feed slot.
  6. Slide the poster board into the feed slot until it is flush with the front of the printer as shown. Align the right edge with the poster board support.


    Note: You may need to increase the suction by pressing the up arrow button. This helps hold the poster board in place during loading and printing.
  7. Press the OK button. The poster board feeds into the printer.
  8. Select one of these settings on the LCD screen:
    • If the paper settings are correct, select Keep Settings Above.
    • Select Change Settings and adjust the settings.
    Note: Make sure you select Enhanced Board as the Media Type setting in the Others menu.
  9. Press the OK button.
  10. Run your print job. After printing, the sheet stays in the printer.
  11. To remove your print, hold the sheet and press the OK button.
    Note: Store cut sheet media flat in its original packaging. Storing sheet media unprotected or on its long or short edge can lead to excess paper curl, cause damage to the printer, and ruin your prints.
  12. After removing your print, press the OK button.
Push the poster board support back into the printer.
Related tasks
Storing the Paper Basket
Related references
Available Epson Papers
Paper Specifications