Aligning the Print Head Using the Product Control Panel

You can align the print head using the control panel on your product.
  1. Load a few sheets of plain paper in the cassette.
  2. Press the  home button, if necessary.
  3. Select Setup.
  4. Select Maintenance. You see a screen like this:


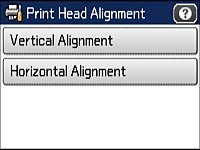
  5. Select Print Head Alignment. You see a screen like this:


  6. Do one of the following:
    • If your printouts look blurry or vertical lines are misaligned, select Vertical Alignment.
    • If you see horizontal bands at regular intervals, select Horizontal Alignment.
  7. Follow the on-screen instructions to print an alignment sheet.
    Note: Do not cancel printing while you are printing head alignment patterns.
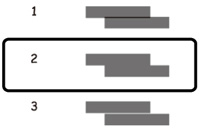
  8. Check the printed patterns on the alignment sheet and do one of the following:
    • If you printed a vertical alignment sheet, select the number representing the most solid printed pattern for each set on the LCD screen .


    • If you printed a horizontal alignment sheet, select the number representing the pattern with the least amount of separation or overlap on the LCD screen.


Was this page helpful? Yes or No.
Privacy Policy | Your California Privacy Rights | Terms of Use