To change settings for an input source, make sure the source is connected and select that source.
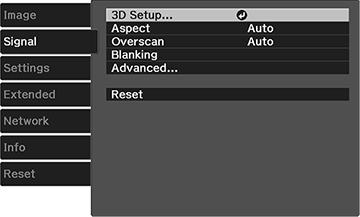
| Setting | Options | Description |
|---|---|---|
| 3D Setup | 3D Display
3D Format 2D-to-3D Conversion 3D Depth Diagonal Screen Size 3D Brightness Inverse 3D Glasses 3D Viewing Notice |
Selects various 3D options
3D Display: enables 3D mode 3D Format: selects the 3D format 2D-to-3D Conversion: converts 2D images to 3D 3D Depth: sets the depth for the 3D image Diagonal Screen Size: selects the actual size of the screen to maximize the 3D effect 3D Brightness: adjusts the brightness of the 3D image Inverse 3D Glasses: reverses the images projected for the left and right eyes (enable only if 3D images do not display correctly) 3D Viewing Notice: enables the viewing notice displayed when using 3D mode |
| Aspect | See the list of available aspect ratios | Sets the aspect ratio (width-to-height ratio) for the selected input source |
| Tracking | Varying levels available | Adjusts signal to eliminate vertical stripes in computer images from the PC input port |
| Sync. | Varying levels available | Adjusts signal to eliminate fuzziness or flickering in computer images from the PC input port |
| Position | Up, down, left, right | Adjusts the image location on the screen |
| Auto Setup | On
Off |
Automatically optimizes computer image quality |
| Overscan | Auto
Off 4% 8% |
Changes the projected image ratio to make the edges visible by a selectable percentage or automatically |
| Blanking | Various settings | Covers part of the image with a black screen to hide
raster lines at the edge of the screen.
Note: Using
this feature reduces the image size. |
| Advanced | HDMI Video Range
Color Space Dynamic Range Image Processing |
HDMI Video Range:
sets the video range to match the setting of the device connected
to the HDMI input port
Color Space: sets the conversion system for the color space (Auto, BT.709, or BT.2020) Dynamic Range: selects the HDR (High Dynamic Range) mode Image Processing: adjusts how images are processed; select Fast to display images quicker; select Fine to display images in higher quality |