You can
split the screen and project from two sources at the same time. You
can annotate and interact with both sources.
Note: If you
make adjustments such as Brightness, Contrast, Color
Saturation, Tint,
Sharpness, Noise Reduction, and Deinterlacing, they are only applied to the
image on the left. Default adjustments are made to the image on the
right.
- Press the Split button
on the remote control and then select the
 Split tool on the bottom toolbar,
or select the Split tool directly.
Note: If you press the Split button, the current image is reduced and appears on the left side of the projection surface.You see a screen like this:
Split tool on the bottom toolbar,
or select the Split tool directly.
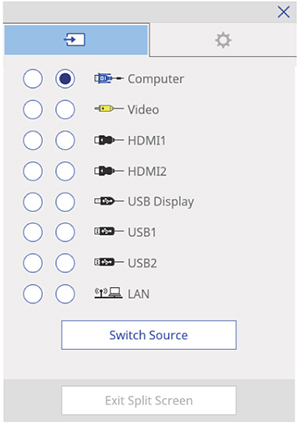
Note: If you press the Split button, the current image is reduced and appears on the left side of the projection surface.You see a screen like this: - Select the two sources you want to display. Not all
combinations of sources are valid. If you want to write on a
blank screen, select any unused source. Unused sources display the
color selected in the Display
Background setting. The Logo option will display a blue background.
Note: You can also press the Menu button on the remote control and select the Source option to select the two sources.
- Press the Switch Source button to display the two sources.
- Do any of the following as necessary:
- To change to
a different source at any time, press the Menu button on the remote control and select
Source, or press the
 Select Source icon on the bottom
toolbar.
Select Source icon on the bottom
toolbar. - To annotate on the right screen, press the Menu button on the remote control, select Target Pen Mode, and select Screen Right. Set the Pen Mode setting to PC Free Annotation.
- To use PC
interactive mode on the right screen, press the Menu button on the remote control, select
Target Pen Mode, and select
Screen Right. Set the
Pen Mode setting to PC Interactive.
Note: If you select Video, USB1, or USB2 as a source, you cannot use PC interactive mode.
- To reverse the left and right images, press the Menu button on the remote control and select Swap Screens.
- To make one image larger, press the Menu button on the remote control, select Screen Size, and select Larger Left or Larger Right.
- To align the images with the top of the screen, press the Menu button on the remote control, select Align, and select Top.
- To outline the drawing area, press the Menu button, select Display Drawing Area and select On.
- To change to
a different source at any time, press the Menu button on the remote control and select
Source, or press the
- To return to displaying one image, press the Split or Esc button on the remote control, or press
the Split Screen icon on the bottom
toolbar and select Exit Split
Screen.