You can
select the whiteboard features you want to use and control the way
whiteboard pages are saved in the projector.
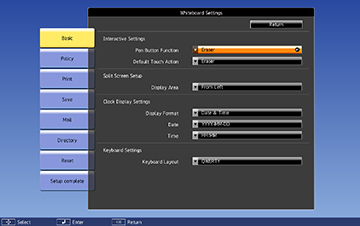
- Press the Menu button on the remote control.
- Select the Extended menu and press Enter.
- Select Whiteboard Settings and press Enter.
- Select the Basic menu and press Enter.
- Select the following options as necessary:
- Pen Button Function selects the operation performed by the button on the side of the interactive pen
- Default Touch Action lets you select the default action when you switch to whiteboard mode
- Display Area selects the displayed area of the whiteboard in split screen mode
- Display Format, Date, and Time let you customize the date and time display on the bottom whiteboard toolbar
- Keyboard Layout lets you select the onscreen keyboard layout
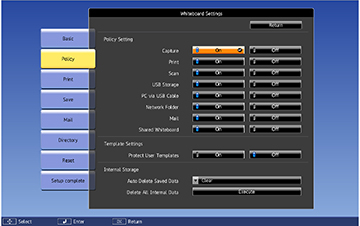
- Select the Policy menu and press Enter.
- Select the following policy options as necessary:
- Policy Setting options let you disable capturing, printing, scanning, USB storage, PC connections, network storage, emailing, or sharing from the projector. All features are enabled by default.
- Protect User Templates restricts the ability to add or remove user templates. When set to On, you can only add or remove user templates through the web browser interface. When set to Off, you can add or remove user templates in whiteboard mode.
- Auto Delete Saved Data lets you clear or retain the contents of the whiteboard when turning off the projector. When set to Clear, you are prompted to save the whiteboard contents when powering off the projector.
- Delete All Internal Data lets you delete data
stored in the projector. If you have problems with internal
storage, or need to dispose of the projector or have it repaired,
select Execute to delete all
stored data.
Note: Stored data includes user templates, the address book, and whiteboard connection logs.
- When you finish selecting settings, select Setup complete and follow the on-screen instructions to save your settings and exit the menus.