- Press the Menu button.
- Select the Extended menu and press Enter.
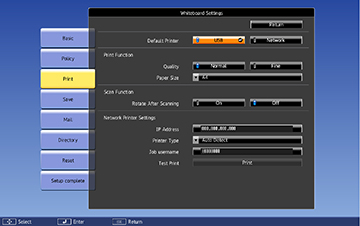
- Select Whiteboard Settings and press Enter.
- Select Print and press Enter.
- Select the following printing options as necessary:
- Default Printer lets you select either
USB or Network as the printer connection. You can
change this setting when you print in whiteboard mode, but not in
annotation mode.
Note: Selecting USB will also enable scanning from Epson All-in-One printers.
- Quality lets you select the default print quality.
- Paper Size lets you select either Letter , A4, or A3 as the default paper size.
- IP Address lets you enter an IP address for a printer connected to the same network as the projector.
- Printer Type lets you manually select the printer type or let the projector automatically determine the printer type
- Job username lets you assign a user name for print jobs up to 31 alphanumeric characters long. Do not use a colon (":") or spaces in the user name.
- Test Print lets you send a test page to the connected printer.
Note: Use the displayed keyboard to enter the IP address if necessary. Press the arrow buttons on the remote control to highlight numbers and press Enter to select them. - Default Printer lets you select either
USB or Network as the printer connection. You can
change this setting when you print in whiteboard mode, but not in
annotation mode.
- When you finish selecting settings, select Setup Complete and follow the on-screen instructions to save your settings and exit the menus.