You can
share the whiteboard with up to 15 devices on the same network as
the projector, including computers, devices, and other projectors
that support whiteboard sharing.
Note: First
set up the projector on a network using port 80. If using SSL, also
open port 443. Check with your network administrator for
details.
- Press the Whiteboard
button on the remote control or control pad, or select the
 whiteboard icon on the main
toolbar. (You can also press the Home button on the remote control or
projector and select Whiteboard
Sharing on the Home screen.) The projector displays
the whiteboard.
whiteboard icon on the main
toolbar. (You can also press the Home button on the remote control or
projector and select Whiteboard
Sharing on the Home screen.) The projector displays
the whiteboard. - Select the
 share icon on the projector
control toolbar. You see the following screen:
share icon on the projector
control toolbar. You see the following screen:
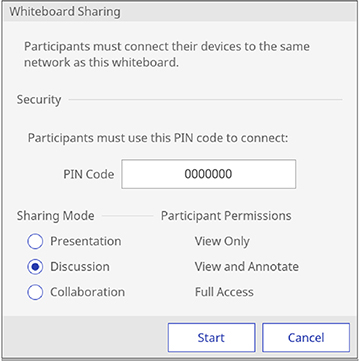
- Select Start sharing this whiteboard. You see a screen like this:
- Users connecting to the shared whiteboard must enter the
displayed PIN code. To customize the PIN code, tap the PIN code
text box and enter a 7-digit code using the on-screen
keyboard.
Note: You cannot change the PIN code until you start a new whiteboard sharing session.
- Select one of the following as the Sharing Mode setting to control access to
whiteboard features:
- Presentation: to allow viewing and saving the whiteboard screen.
- Discussion: to allow drawing on the shared screen.
- Collaboration: to provide access to all available features except creating a new session.
Note: The projector displays connection information about the shared whiteboard under Network Information. - Select the Start button. The Whiteboard Sharing screen is displayed.
- Select the following as
necessary:
- Change Sharing Mode to change the permissions for connected users
- Send Invitation to send email invitations with a link to the shared whiteboard
- To hide the connection information, select Close.
- When you finish sharing the whiteboard, select Stop Sharing.