If
your computer meets the system requirements, you can send video and
audio output to the projector through the control pad's
USB-B port (preferably USB 2.0).
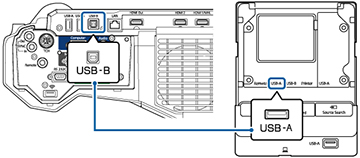
Connect the projector and your computer to the control pad using
USB cables.
- Turn on your computer.
- Set the USB Type B setting in the External menu to one of the USB Display options.
- Connect a USB cable to the USB-B port on the projector and to the USB-A port on the control pad.
- Connect another USB cable to the USB port on the bottom of the control pad and any available USB port on your computer.
-
To use USB Display, do one of the
following:
- Windows 10/Windows 8.x: Click EPSON_PJ_UD in the upper right-corner, then select Run EMP_UDSe.exe in the dialog box that appears to install the Epson USB Display software.
- Windows 7/Windows Vista: Select Run EMP_UDSE.exe in the dialog box that appears to install the Epson USB Display software.
- Mac: The USB Display setup folder appears on your screen. Select USB Display Installer and follow the on-screen instructions to install the Epson USB Display software.