Select the
basic settings for the photo or document you want to print.
- Open a
photo or document for printing.
- Select
the print command in your application.
Note: You may need
to select a print icon on your screen, the Print option in the File menu, or another
command. See your application's help utility for
details.
- Select
your product as the Printer
setting.
- If
necessary, click the arrow next to the Printer setting or the
Show Details button to expand the
print window. You see the expanded printer settings window
for your product:
Note: The print
window may look different, depending on the Mac OS version and the
application you are using.
- Select
the Copies and Pages settings as necessary.
Note: If you do
not see these settings in the print window, check for them in your
application before printing. They may be accessible by selecting
Page Setup from the File
menu.
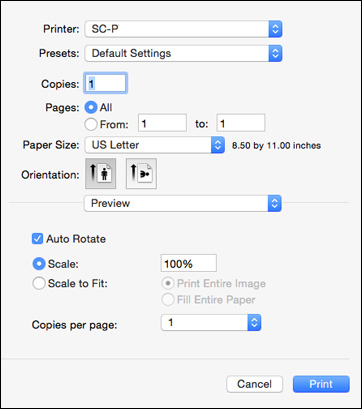
- Select
the size of the paper you loaded as the Paper Size setting.
Note: You can
reduce or enlarge the size of the printed image by selecting
Paper Handling from the pop-up menu
and selecting a scaling option.
- Choose
portrait or landscape as the Orientation setting.
- Select
any application-specific settings that appear on the screen, such
as those shown in the image above for the Preview
application.
- Select
Printer Settings from the pop-up
menu.
Note: In certain
programs, you may need to select Advanced before you can select Printer Settings. For more information about
printer settings, click the ?
button.
You see these settings:
- Select the Paper Source setting.
- Select
the type of paper you loaded as the Media
Type setting.
Note: The setting
may not exactly match the name of your paper. Check the media type
settings list for details.
Note: The
Ink setting may change depending on
the size and type of paper you select. To avoid changing black ink
more often than necessary, set the printer to the type of black ink
you usually use on the control panel.
- Select
one of the following as the Print
Mode setting:
- Select
EPSON PrecisionDot for any type of
photographic printing.
- Select
Advanced B&W Photo to print
black-and-white photos on certain types of photo paper. See the
list of Advanced B&W Photo options for details.
- Select
Black/Grayscale when using plain
paper.
- Select
one of the following as the Color
Mode setting:
- Charts and Graphs: Performs
color correction based on the sRGB space. Click the Advanced Color Settings tab to use advanced
color controls.
- EPSON Standard (sRGB): Increases the contrast in
images. Click the Advanced Color
Settings tab to use advanced color controls.
- Adobe RGB: Matches image colors to the Adobe RGB
color standard. Use this setting if your source file was captured
in Adobe RGB. Click the Advanced Color
Settings tab to use advanced color controls.
- Off (No Color Adjustment): Turns off color
management in your printer software so you can manage color using
only your application software.
Note: If desired,
you can instead use ColorSync to manage colors. In most cases, you
get better results by applying color management in your
application, rather than in the printer driver.
- Select
the Output Resolution setting you
want to use.
- Select
any of the available print options.